Exposure is about how much light is let through, and generally to do with the correct exposure (unless for special effect). There's two aspects to it:
- The amount of light let through, controlled by the aperature (or iris).
- The length of time it's allowed for, controlled by the shutter speed.
They're interdependent: Let more through, and you'll need a shorter exposure, to get the same results. And vice versa.
You can use this to your advantage. You might want a short exposure, so that you can capture a still image of an action scene, so you take a fast picture with the lens widely open. Alternatively, you might want the long depth of field that you get when the lens is nearly closed, so you'd take a very long exposure. Though you can only do that with objects that aren't moving.
Automatic exposure
Auto-exposure systems often get it wrong. They tend to try and “average out” the picture, to get an average light level across the whole picture. This doesn't work very well when the scene has varying amounts of light across it, nor when the scene is comprised of non-average light-level subjects (e.g. objects that are quite dark or bright, or where you only care about the exposure of an object in the foreground).
For instance, the following picture is of a black computer keyboard, but the camera automatically tried to get an average picture, and over-exposed it until the black became mid-grey.
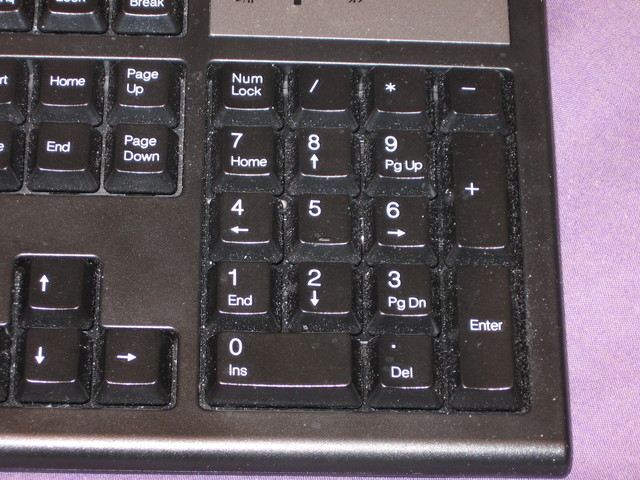
The keys should be black, the plastic around them is a very dark grey, the legends on the keyboard should be somewhat less than completely white, all the bright white specks of dust should be barely visible, and the background behind the keyboard is actually a chocolate colour.
Manual exposure
To correctly expose such a scene, you've got four ways to do it:
-
Take multiple picture at different exposures, hoping to get one that's suitable. You might do this, anyway, with any of the techniques mentioned below, in case one looks better than another.
-
By eye, with a camera that shows you the final rendered image, while you're adjusting the lens. This'll require either a digital still camera, or a video camera.
-
Using a light meter that measures the amount of light landing in a scene. This allows you to adjust the camera for the scene, and objects within that scene will have their natural exposures. Though for objects that are extremely bright or dark, you might have to adjust by experience, depending on the range of brightnesses that your camera can handle. You may have seen photographers making this sort of measurement by holding a meter in front of someone's face, but with a white diffused filter on the meter that faces the light source.
-
Using a light meter that measures the amount of light reflected from an object, though you'll need some sort of “standard” object to reflect the light off, if the meter reading is to be of any use for setting an exposure (you'll get less light off a black object than a white object, measuring the reflectance only tells you how much light is there, not how to set your camera). This metering method is the same as how most cameras with an in-built light meter set their exposure (reading the light entering the lens, with no knowledge of what the object is reflecting that light). You might have seen photographers doing this with a light meter pointed at someone's face, but that'll only work for a given skin tone.
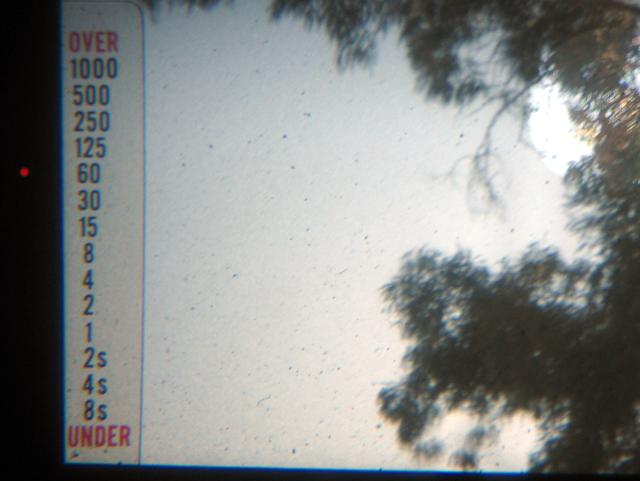
My Chinon CE-4 35 mm camera has a rather nice exposure meter (pictured above). The red dot indicates the current shutter speed (in fractions of a second), and a second flashing red dot (not shown), above or below it, indicates how far off you are from correct exposure, and in which direction. Then you adjust the exposure time and/or the aperature until both dots are on top of each other. It's a simple way of using one gauge for both functions, and it has a rapid response, so you can very quickly set the exposure for a shot.
Special exposure
More arty pictures might involve setting the exposure to suit how you want some particular aspect of the picture to come out, regardless of the effect it has on other parts of the picture, or to deliberately create a certain effect, overall. The following picture is like that, the whole thing is over-exposed in various degrees, for different effects.
![[photo]](/business/images/panasonic-f250-camera.jpeg)
Much of this camera is black, and barely visible when photographed, so the exposure has been increased to make the details of the black parts easily seen. The background was a very pale yellow, but was over-exposed to the point that the right side goes totally white. But not too much, so there's still some colour at the bottom left, with a graduation across the whole background. To me, this looked better than it all being flat white.