The page describes modifying the circuitry of a camera, the risk of doing this is all yours, do not attempt this if you're not proficient at electronics.
The “colour temperature” of light, measured in “kelvin”s, determines the tint it appears to have. Incandescent indoor lighting (around 2800 K) is low temperature, and tends towards orange/red. Likewise with traditional television studio lighting (3200 K) having a warm orange/red tint. Daylight/outdoors (5600 K), is high temperature, and tends towards being blue, being much bluer in the morning and evening than during the middle of the day. Fluorescent lighting can have all sorts of colour temperatures, usually with a really poor spread across the colour spectrum, with many dips and spikes at different wavelengths that, often, don't fit well with the spectral responses of film and video cameras. Film lighting usually tries to mimic daylight.
Because of these variations, and the inability of most cameras to adequately reproduce a pleasant picture under all lighting conditions, as-is, we need to adjust the camera to compensate, to normalise them. Whereas the human eyes and brain can cope with a fairly large change in tint, without it appearing to be such a large change, the camera is nowhere near as good. Whether you completely normalise the response, so that everything looks the same, no matter what the lighting conditions, or you simply reduce the extreme differences, is an artistic choice. The modern tendancy is to let indoor and outdoor lighting look somewhat different.
White balancing is adjusting the red and blue video signal strengths to match the colour response of the camera to the lighting conditions it's filming under. It's, generally, done by filming a white card, and adjusting the red and blue video levels so that the card looks white, rather than tinted. Hence the name, although the adjustment is actually done by measuring the signal, rather trying to make it “look white,” by eye. The green channel is left alone, as you're adjusting the red and blue against it, and each other.
In the film world, you'd call this “colour temperature compensation,” or “colour correction.” And you'd do so by using colour correction filters on the lens to suit the film stock in the camera, and the lighting conditions. And/or adjusting the processing of the film, when making a positive print from the camera negative (colour timing). Or by using different film stock, made to suit the type of lighting you're filming under.
Video cameras can also use colour temperature correction filters, as there's quite a significant difference between indoor and outdoor light to try and compensate for, electronically. Most professional cameras have a filter set built into the camera, the F15 does not. You'd have to add one in front of the lens, if you wanted to. And you probably do want to, if you're trying to manually white balance a camera (for outdoor lighting) through the CCU, as the controls have a very limited range of adjustment. We have 85B correction filters for fitting to the lens when filming outdoors, though this precludes the use of ATW mode on those cameras.
How to white balance the WV-F15 camera
You have three basic modes, with some interaction between some of them. To change modes, you'll need to turn the “auto preset” mode off on the camera head (the green light shows its in the preset mode), as it forces the camera into ATW mode (amongst other things). Or, be connected to a CCU, which forces the auto-preset mode permanently off.
-
There's automatic tracking white balance (ATW), where the camera continually adjusts itself to the ambient lighting conditions around the camera (which may not be the same as lighting conditions of what you're actually filming). It uses a separate colour sensor for this, it doesn't assess the video image through the lens (the ATW mode is the only thing that uses that sensor). ATW is the default mode selected whenever the camera head is turned on, if it's not connected to the WV-RC35 CCU through the WV-AD37 studio back-end on (the ATW mode is one of the settings set by the “auto preset” mode). But with a CCU connected, the mechanical switch on the CCU selects the ATW or AWC mode, always, and the “auto preset” mode is forcibly disabled.
-
There's automatic white balance (AWC—Auto White balance Control), where you film a white test object and press a “set” button; the camera will automatically adjust itself, there and then, and will stay set that way until the camera's powered off. This adjustment is made made by measuring the image received through the lens. You'll need to redo the white balance each time that the lighting conditions change in an unwanted manner (such as going from indoors to outdoors), and each time you turn the camera on. As this camera has no long-term memory to keep the settings when its turned off, it can only hold white balance settings while turned fully on. Or, while kept partially powered up in standby mode, and with a back-up battery installed in the right-hand side panel. Unlike other cameras, the battery backed-up memory only holds white balance settings while the camera has external power.
-
There's manual white balance controls, where you'll adjust a couple of red and blue gain controls, and a manual gain on/off control switch, with a screwdriver, through the side of the camera (hidden under the hinge down flap on the left side of the camera). Or use the red and blue gain controls on the CCU (there's no manual on/off switch on the CCU, they're always on). Again, once set, the settings will stay as you've set them, so you'll need to reset them when lighting conditions change, or the camera is powered off (when it's turned back on, again, it'll come on in ATW mode if there's no CCU attached, or whatever mode the CCU is set for, probably changing the camera's white balance values that your, previous, manual settings were combined with).
This camera has some oddities about manual white balancing:
Unlike other cameras, there is no auto/manual mode switch, you can simply turn on the camera's manual controls, and use them, while in ATW or AWC modes, on top of the auto settings. The CCU manual controls are always on, they have no disable switch. When you use the manual controls while in ATW mode, they change the tint of the picture on top of the ATW settings (so, for instance, you could always make the picture consistently a little bluer). But when you use them while in AWC mode, the auto and manual controls work against each other: You can paint on top of the auto settings, but if you press the white set button again, it will re-white balance the camera, removing any tint you added with the manual controls. If you add blue, and it removes blue, and you repeat that process a few times, at least one of the controls will probably run out of range to make any further adjustments.
The manual controls don't have a great deal of adjustment range, particularly the ones on the CCU, so a full manual white balance mayn't be possible, under some circumstances. You may have to do an auto white balance, then use the manual controls to fine tune the results. This is particularly noticeable when the camera is first turned on, even more so if there is no ATW sensor attached, as some of the cameras will come on with a very orange cast to the picture.
Unfortunately, there is no “preset” mode, though it is possible to add a white balance preset (see further down this page). Fixed presets mode are very useful for people always filming under the same lighting conditions (e.g. cameras permanently used in a small studio, a church, etc.), where it would be handy to have a simple solution to avoid having to keep re-white balancing, especially with unskilled crew, when conditions are unsuitable for the ATW to function correctly, or when there's no opportunity to film a test card. At least with a preset mode you've got a good chance at getting decent pictures out of a camera, under some adverse conditions, instead of badly tinted pictures. With a well designed camera, only lighting changes should necessitate redoing the white balance, the camera shouldn't be so unstable that it needs resetting due to itself, nor ambient temperature changes.
It should go without saying, but I'll say it anyway, that white balancing needs to be done while filming the white test object, lit by white lighting, the same lighting that you'll film by. It's no good doing a white balance under one set of lights, then filming under other lights. Nor is it any good trying to white balance off your test object when it's lit by coloured lighting. Nor trying to white balance off a coloured object.
What happens when you switch between modes?
If you switch from ATW to AWC, the white balance stays at the last settings set by ATW (which should be fine, if the ATW had set the white balance correctly). You'll have to push the white balance “set” button to make the camera change the white balance, or go back to ATW, again. Until you re-set the white balance, or change modes, the viewfinder on-screen-display will slowly flash “WHITE” at you, to warn you that a white balance may need to be done.
If you switch from AWC to ATW, the ATW immediately adjusts for ambient light conditions, losing any prior AWC settings.
If you turn on the manual controls (on the head), they simply repaint the picture on top of the ATW or AWC settings, as an offset. They do not turn off the automatic functions. If you turn the manual controls off, again, you go back to how it was with the prior ATW or AWC settings.
The CCU has no means to turn the manual controls on and off, they're always enabled. It only has a switch to change between ATW or AWC auto modes, plus the “set” button to set the AWC.
Automatic/manual white set
Instead of the auto-tracking white balance (ATW), which continually adjusts the white balance (perhaps continually getting it wrong), you've two options for fixing the white balance to one setting (but only for the duration of your filming, as any fixed settings will be lost when the camera is powered off), and they are; either automatic white balance (AWC), or manual white balance. In either case, you'll take the camera out of “auto preset” mode, and put it into AWC mode (even if you're going to manually set the white balance, because you don't want the ATW changing your settings).
For AWC it's “automatic“ in that it'll set the white balance, for you, once, when you press a “set” button. You aim the camera at a white test object, under the lights you will be filming with, press the “set” button, and it takes a few seconds to set the white balance. If you have a viewfinder with the on-screen-display text, you'll see “WHITE” rapidly flashing while it sets it (you'll also see that message, slow blinking “WHITE” text, when you change the mode to AWC, until you do the white balance, to remind you that it hasn't been set). Otherwise, you can watch on a colour video monitor, and see that the picture loses any erroneous tint. It's a good idea to check for that, anyway, using a monitor or a scope, just in case the automatic setting didn't work correctly. Then you can fix the problem (change your lighting, reposition the camera to film the white test object better, etc.), rather than end up filming something awfully tinted.
If the auto white balance fails, then the “WHITE” on-screen-display text will stay slowly flashing on the screen. It could have set things good enough that you'll be happy with it, but you'd want to check. Reasons for failure could be that there wasn't quite enough range for the red and blue gain controls to set the white balance, for the current lighting conditions. Or that there was insufficient light.
For manual white balancing, you'll turn on the manual gain controls in the drop down flap on the left side of the camera, and use the screwdriver controls through the holes next to it (do not force them, they only turn in a half circle), or you'll use the controls on the CCU. Ideally, you'd film a white test object filling the screen, and make adjustments while monitoring the video signal. Though, if you can't fill the screen with a white object, find a white object, or use proper monitors, you'll have to make a best guess. You probably want to do an automatic white balance, first, then do a manual trim with the controls.
In either case, the white object should actually be white (i.e. be without any tint), should be in focus (so that you don't blur in some coloured object from around or behind it), and be exposed correctly (be around 70% of full video signal strength). If you try to white balance while under- or over-exposed you'll probably get it wrong. And with over-exposure, there's a good chance that the white clip circuitry will fool you into thinking that you've white set, when all that's happened is that it's clipped off the over-exposed red or blue signal at white level, but anything less than white will be oddly tinted.
While I've mentioned using a colour video monitor to observe that white balance has set correctly, you shouldn't try to white balance by adjusting for a white looking picture. Most monitors don't display an accurate picture, you'd be adjusting the camera's tint against the monitor's tint, and it's hard to adjust for a null by eye. You really should use a waveform monitor or vectorscope, though a poor-man's alternative is a split screen between the camera and a known white image, to try and match your camera to it. Another old trick was to look at the camera through a high resolution monochrome CRT monitor, and adjust for minimum dot crawl on the picture. Or, with a colour monitor, to turn the colour level control all the way up, to emphasise any tints in the picture, then adjust white balance control to minimise them.
Before the advent of automatic white balance, some cameras had indicators in the viewfinder to let you accurately set manual white balance. Then such nice features got dropped, thinking that auto white balance was good enough by itself. But it often isn't, sometimes you can't fill the screen with a white test object, and you can't tell if it's failed when you're watching a monochrome monitor. Colour viewfinders were a rarity, because they're not high enough resolution to properly focus the camera, nor to be able to see some fine detail (try filming a football game when the ball is invisible, because it's too small for the viewfinder resolution). Thankfully, now, some of the more expensive cameras have a built in vectorscope, so you can properly check these things.
Why doesn't the ATW work properly on the Panasonic WV-F15 camera?
Firstly, you need to have the ATW sensor installed on the camera. It plugs into that 8-pin socket at the top of the camera head, just above the lens. Without the sensor, the rest of the ATW circuitry in the camera head behaves oddly, it defaults to some really bad red and blue video gain settings. You'd need to abnormally align the camera to compensate for a missing ATW sensor; and you could only preset it for one colour temperature (such as 3200K). Or, add something to replace the missing ATW sensor (more about that, below).
Secondly, the camera needs to be aligned with that sensor in the workshop (for tungten and daylight conditions). Every time I've swapped sensors between cameras, they've always mismatched, so there must be a significant margin of error in the design. So if you remove yours, label which camera it belongs with. Camera alignments slip over time, and can be quite bad after a few years. If you have cameras and sensors that seem to be interchangeable without any problems, consider yourself lucky.
The ATW works by (crudely) measuring the colour temperature of the ambient light striking that sensor, then adjusting red and blue video gain to white balance the camera. Which will fail, and fail badly, if the ambient light hitting the sensor is different from the light covering what you're filming (such as standing in the shade, while filming someone in the direct sunlight, and vice versa; filming through a window; and even filming from behind studio lighting, where the lighting off-set is different from on-set). Unlike other cameras, it doesn't do auto-tracking white balance through the lens (which would base the white balance settings on the actual picture).
Under low levels, including when the sensor is covered up, it seems to default to tungsten settings. Under sufficient light, it can track from tungsten to daylight settings, though may struggle with extremely blue daylight, such as around dusk. It does actually track the white balance, rather than just flick between presets for tungsten or daylight colour temperatures (which, for some people, would have been a better choice).
The best uses for ATW would appear to be for ENG style filming with a recorder, where you're repeatedly going indoors and outdoors, and don't have time for a proper white balance. Or, you're filming outdoors for an extended period, where lighting conditions will change during the shoot, and when you won't be able to re-white balance during the shoot. Otherwise, you're far better off to properly white balance the camera, particularly when you want consistency between shots and multiple cameras.
Why does ATW work better on other cameras?
Most other cameras are probably newer, and measure white balance through the lens, based on the picture actually being filmed. So, they have the potential to pick the right balance, better. Though, they often have an indoor/daylight mode switch, as well, to help it do a better job.
However, since you're not filming a test card, with a known content, but an image made up from all sorts of colours, it's very hard to get it automatically correct, and many cameras will simply adjust to remove extreme, or wide-spread colours from the picture. And that will, of course, stuff up any shots that were deliberately coloured. Such as removing the the tint from any coloured lighting that you set up for an effect. Or being fooled into changing the white balance when there's a coloured wall behind them (e.g. turning down the blue gain when there's a blue wall, trying to make the wall look white).
I usually find that through-the-lens ATW makes big mistakes, and continually. For example, I've had a camera change the tint of the entire picture during a zoom shot. As the zoom changed, the camera saw more orange, as it saw more and more of the wall behind the subject, and started changing the white balance in the opposite direction. And, it's quite unlikely that two cameras using ATW will produce matching pictures.
Should I light a set with tungsten lighting, or daylight (whether gelled, or using high temperature lighting)?
Like most video cameras, the camera is factory aligned to work with 3200K tungsten lighting. To film under other lighting conditions, you need to correct the temperature back to 3200K at the camera (by using colour correction filters, and/or adjusting the red and blue video gain). There is no point gelling up your lights to be 5600K, only to have to do the opposite at the camera. What you're doing is losing light through all the gels/filters, which doesn't help when most video lighting tends towards being inadequate rather than over-lit, and you'll be worsening the colour gamut. If you take the filter wheel off most video cameras, you'll see that the 3200K filter is clear, and the daylight filters are orangish 85A and 85B colour correction filters.
Why is the norm for video cameras 3200K, where film normally uses daylight film and lighting? With (domestic) film cameras, they're probably mostly used outdoors, or with a flash that has a daylight colour temperature. Professional movie film cameras used in a studio will probably use very bright, and very high colour temperature lighting. Video cameras have their origins in the studio, back in the 1950s, and they needed a lot of light. They still do, though not quite as much. A lot of light means a lot of heat, so to reduce the need for lots and lots of light, you'd set up a camera so it could work under studio lighting without having any colour correction filters in the way, since you lose light through them. Outdoors, there's plenty of light, so it's far less of a problem to put a colour correction filter in the way, and lose a certain amount of light through it. In fact, outdoors, there's often too much light, and you may need to use neutral density filters to block some of it.
The default for a 3200K camera has the red gain turned down, and the blue gain turned up. Although this can make the blue noisier, it's the colour that our eyes are least sensitive to, so it's not awfully apparent. To use the same camera in daylight, by adjusting the white balance instead of using optical filters, the red gain would be turned up, and the blue gain turned down. And the extra noise in the red signal can be quite obvious to our eyes. Not to mention that some cameras will not have enough range in their gain control to be adjustable in both directions, or the blue image sensor may grossly over-expose outdoors.
Can a fixed preset mode be added?
Yes, it is possible. Simply removing the ATW sensor, and leaving the camera in ATW mode, will leave the camera with a fixed white balance setting. However, the camera will (usually) have a rather awful orange picture, the manual controls don't have enough range to white balance the camera properly, and you may find the camera doesn't consistently white balance the same from one day to the next.
Like the external controls, the internal controls don't have enough range to white balance the camera without doing some modifications. You'd need to replace the ATW sensor with some fixed and/or adjustable resistors, or some links, to preset a colour temperature. Below is the schematic for the original sensor (the whole sensor unit plugged into the camera head).
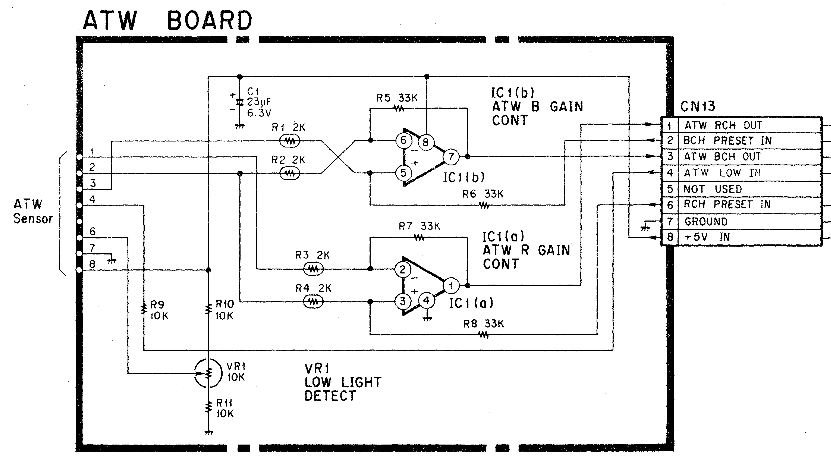
What's in the actual sensor, behind that white translucent window, is not detailed anywhere. The BCH (blue channel) and RCH (red channel) “presets in,” are from trimpots in the head. The outputs from the op-amps (mixing the preset voltage with outputs from the sensor) are voltages going back to more op-amps in the head, mixing the voltages used to control the red and blue video gains.
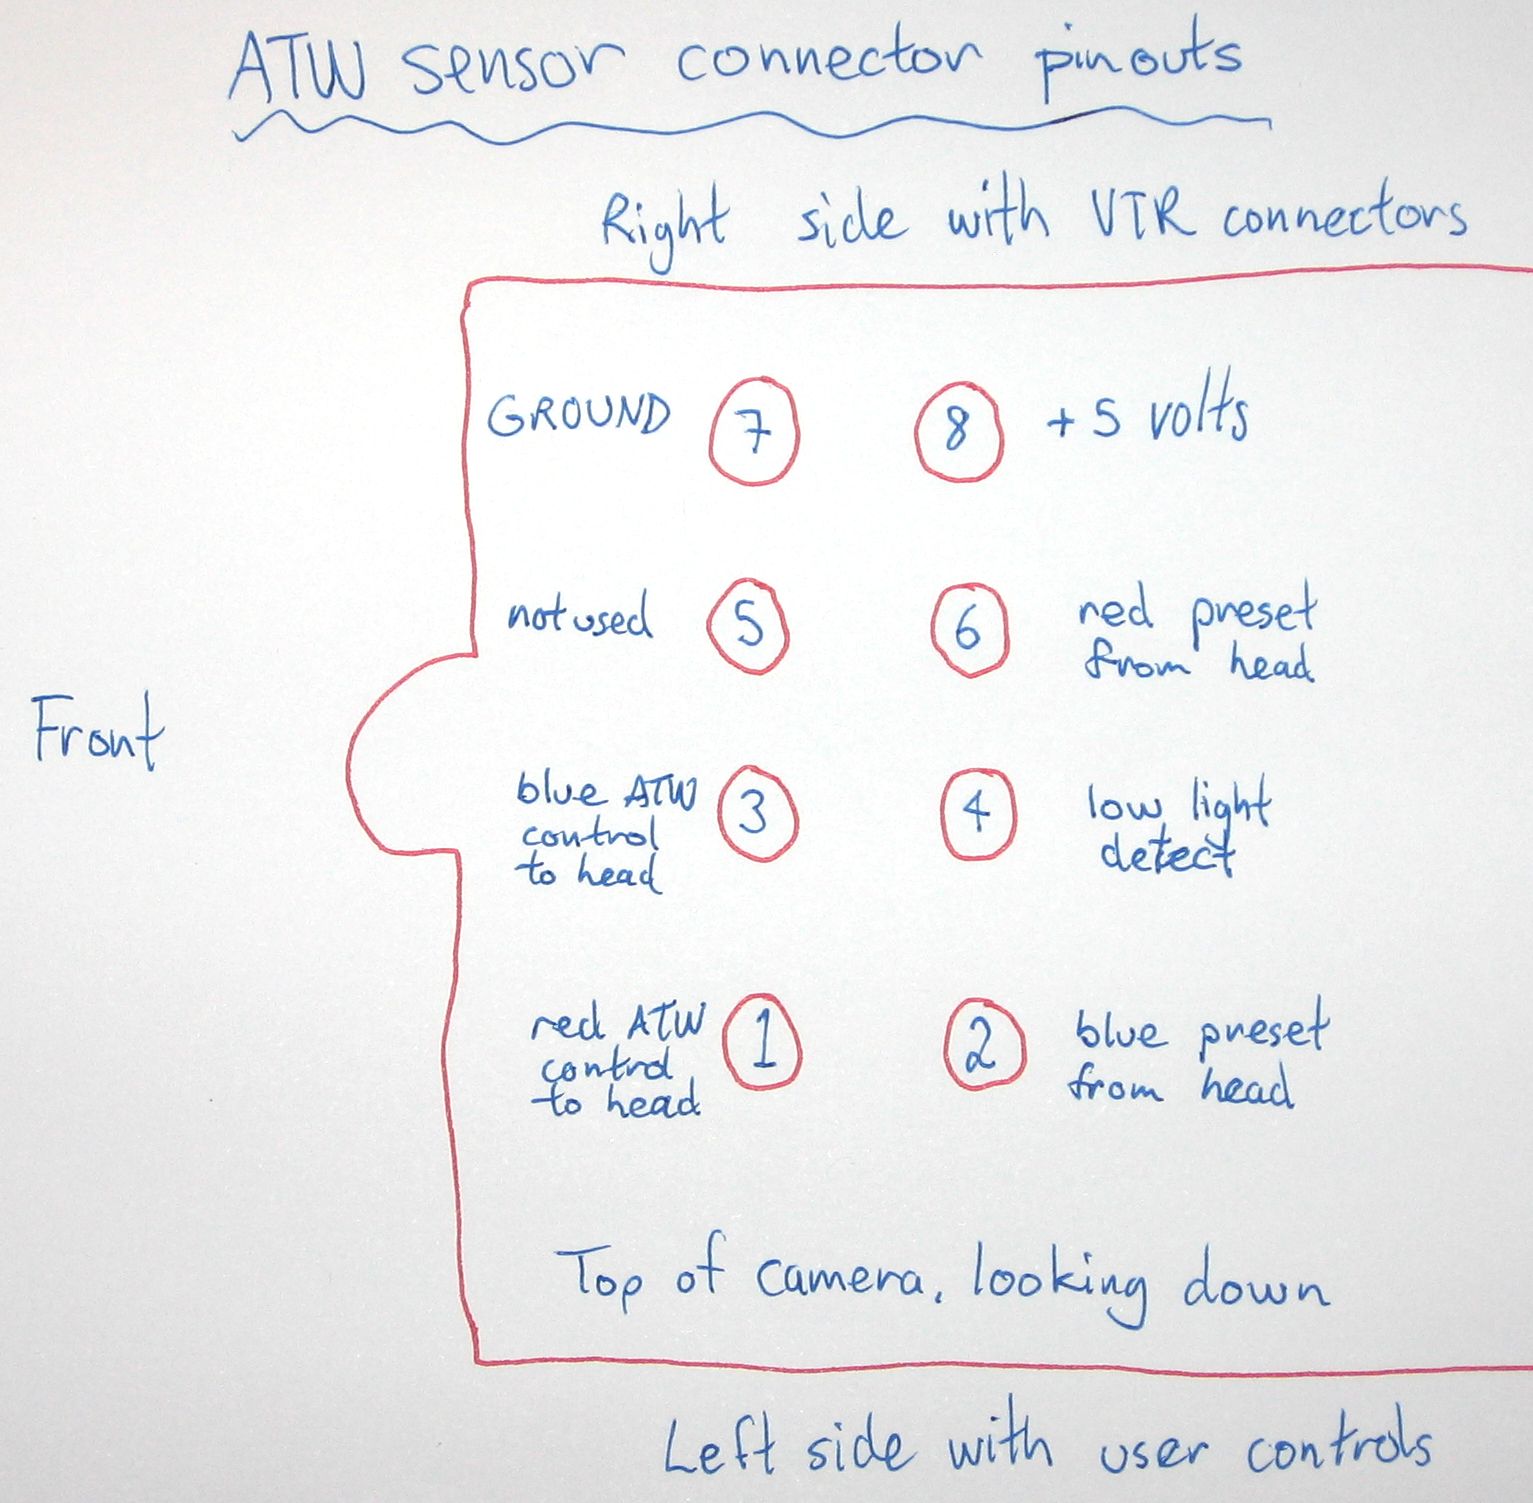
You can replace all of that with two trimpots (one for red gain control, the other one for the blue gain control) and four resistors (as range limits for each pot). The pots would sit between the limit resistors, across the +5 volt rail and ground. And the wiper of the pots to the ATW RCH and ATW BCH output pins (the same way the pots are arranged in the circuit diagram below). You can eliminate the low light sensing circuitry, leaving the output pin open circuit (this low-light sensor only seems to concern the ATW function, the low light warning on the viewfinder goes by the video signal level). I'd be inclined to built two sets of controls, for indoor and outdoor lighting, with a toggle switch between them.
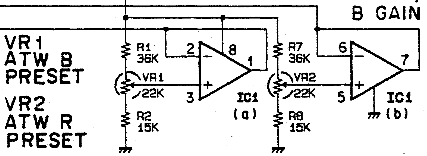
Essentially, you're moving these preset controls to outside of the camera. This circuit connects to the diagram further above. The outputs from these op-amps go to the preset inputs on the other diagram, and its op-amps mix the preset values with the sensor readings.
On a fairly well adjusted camera, you're trying to put 1.8 volts onto pins 1 and 3, for 3200 K lighting (1.8 volts is the internal reference voltage used by the camera, another indication that 3200 K is the default lighting for the camera). A 3k2Ω and 1k8Ω fixed resistive divider between +5 volts and ground, to pins 1 and 3, together, should give you a fixed indoor preset. If this results in a slightly tinted picture, you could align the ATW gain trimpots, on the process board, or adjust the resistor values. You could, alternatively, compensate with the manual user controls, in the side flap. But they only work when you take the camera out of auto-preset mode (and when not connected to a CCU, if I recall correctly).
As an alternative, if you didn't want to build a sensor replacement, you could just bridge the sensor socket's pins 2 to 3, and 6 to 1, on the camera head (I'd do so with, at least, a few KΩ resistors, to protect the output of the op-amps after the preset trimpots), and adjust the internal controls on the process board to preset a fixed white balance. Using the manual white balance controls, later on, if you needed to tweak it a bit, and didn't want to open the camera up, again. Though this would probably mean presetting the camera for either indoor or outdoor use, and leave you with no way to change it (you'd have to put a 5600 K to 3200 K conversion filter on the lens, when you went outdoors, or vice versa).
As another, even simpler alternative, you may simply ground the ATW input connectors (connect pins 1 & 3 to pin 7). That worked on two of the cameras that I've experimented with. And was simpler to implement and adjust for, though you could only have one preset mode, indoor (3200K). In this case, for fine tuning, you'd adjust the gain trimpots, the output from the presets aren't connected anymore. This was easily done by cutting up a paperclip to make a small U-link, and soldering another L-shaped bit of the paperclip to the U-link, for the third connection. Or, if you have a PCB header plug, you can snip off some of the pins, then bridge three of them together.
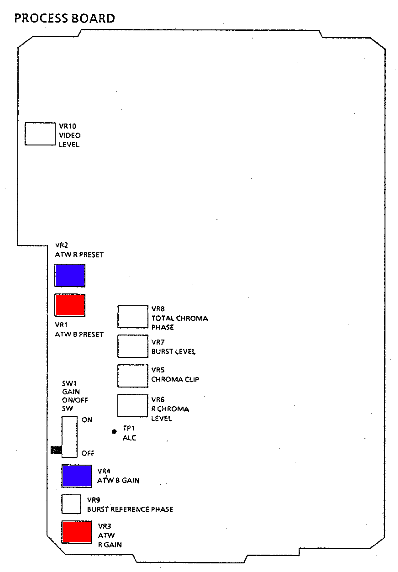
The process board is the second vertical board beside the sensor block, on the left side of the camera (the side with the white balance switches and buttons on the outside of the camera). If you're bridging pins 1 & 6, and pins 3 & 2, the ATW preset trimpots you want to play with are in the middle of the board (vertically), on the outer edge. They're not labelled on the board, other than as VR1 and VR2. I've coloured them red and blue in the middle of the layout diagram, below. (NB: I think the manual has mislabelled the red and blue presets the wrong way around, though this doesn't really matter, as you'd be adjusting both of them.)
If you're feeding preset voltages into pins 1 & 3, or grounding them, then you'll probably need to tweak the ATW gain trimpots (they're the pair of controls, VR3 & VR4, that I've coloured in at the bottom of the layout diagram, below). The preset trimpots will not be connected in the circuit, at all.
Aim the camera at a white test card, and very slowly adjust the pots to white balance (the ATW circuitry is in the middle of a feedback loop, and can have a rather sudden effect). For more details on internal adjustments, have a look at the workshop alignment page.
NB: The ATW circuitry, whether working normally or being modified for preset values, may oscillate between two white balance settings that are slightly different from each other, about two or three times a second. This can actually be noticeable, particularly on cameras where the chroma is turned up too high (all the camera's I've used were like that, they had excessive chroma, and you could see the white balance oscillating). So you may want to chose ATW mode (for a few seconds) to preset your white balance, then flick over to AWC mode, to maintain a fixed setting. Of course you'll be stuck with the blinking “WHITE” on-screen-display warning text showing on the viewfinder, unless you, also, modify the viewfinder signal to cut off the on-screen-display text.
You may strike a problem with the camera being inconsistent from one day to the next, thanks to circuitry tolerances being sensitive to ambient temperature, and other voltage variations. All cameras with a preset mode have that potential problem, but it's still better than filming with deep orange or blue pictures, because you weren't able to do a manual or automatic white balance before you started filming.
Other quirks
On other (better) cameras, the adjusted red and blue levels are done close to the start of the signal chain, before red, green, and blue, are combined together to make up the monochrome luminance signal. So white balancing those cameras, also corrects the luminance response (as it should do).
But, on the WV-F15 cameras, as far as I can see, the luminance signal is comprised of fixed red, green, and blue signal levels, and only the chrominance values are altered during white balancing. This is wrong, albeit subtly, and probably not noticed until you mix the pictures from these cameras with other video cameras (though all cameras always look somewhat different, no matter how hard you try), or if you have to film under extremely tinted lighting.