A custom-built system that's a party line system (e.g. all parties can talk to each other simultaneously). There's a base unit which provides power and acts as a hub between all stations (the base also includes two in-built stations), several remote stations, and a collection of headsets. This is part of the equipment we use when doing multi-camera video recording.
Features
-
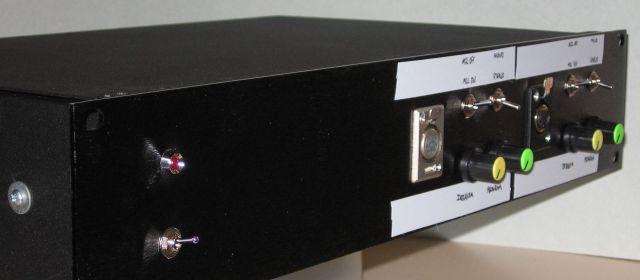
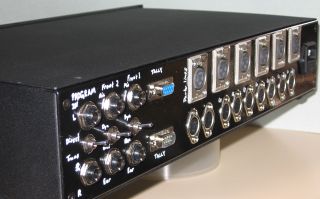 Rear panel of base station
Designed to connect multiple stations together, currently there are six stations built. Two are in the main unit, the rest are remote. Three of the remote stations are built into the remote ends of the 50 metre multi-core camera cables (there's a box at each end of the cable, with video and audio connectors), and there's one independent station (as might be used by a floor manager, it's not part of a camera multi-core cable). The intercoms are independent from the cameras, even though they're using some of the wires in the same cable. Many video cameras use completely different types of intercom systems that aren't compatible with each other, so it can be an advantage to use an intercom that's not part of the camera (use one independent intercom system, where everything works together properly, rather than trying to interface different types).
The base unit has nine eight-pin connectors for connecting power, intercom audio, program audio, and signal tallies to nine remote stations; and six three-pin XLR connectors for providing power and intercom audio to six remote stations using ordinary three-pin XLR microphone leads. Jobs requiring more stations (than already built) must be booked sufficiently in advance to allow the building of more stations, and may require pre-payment for the building expenses (approx $40 parts, ≤1 hour labour, plus another headset, which range from $30–$800, depending on the type, though we still have a few spare cheap headsets that we haven't built stations for).
-
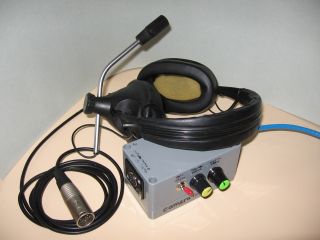 A remote station
Each station has a mute switch for its own microphone, a volume control for listening to the intercom party line, and a volume control for listening to a program audio feed (the program feed feature isn't available on stations connected using just a three-pin lead). The microphone send level is fixed at the same amount on each station.
-
The “progam audio feed” allows monitoring of another audio signal on each station, the base unit distributes this feed to each station. This allows camera operators, for example, to listen to the program being recorded, so they can prepare shots on their own initiative, or follow a script.
The feed input has a switchable input between using a floating transformer coupled input (for ground-loop breaking, or balanced audio sources), or an AC coupled unbalanced input referenced to ground (and mains earth). The program input is two-channel stereo. This is mixed to mono for the mono stations, and the stereo stations can select between mono or stereo sound reproduction.
-
All stations are designed for low impedance balanced or unbalanced dynamic microphones, and low or medium impedance headphones. Some stations have an switchable option to power an electret microphone. Most stations use a 5-pin XLR connector for their mono headset (all using the same pin-outs). Most stations are mono, some have stereo (intended for someone who's monitoring stereo sound recording to also be able to monitor the intercom through the one set of headphones), stereo stations can switch between mono or stereo sound reproduction. One stereo station has a 7-pin XLR headset connector. Some stereo stations have two 6.5 mm TRS phone jacks for independent microphone and headphone connections.
-
The headphone outputs are designed to be audible even in moderately loud environments (e.g. studio or theatre work), but are really not loud enough for working in very noisy environments (e.g. filming rock bands or motor sports). That would require more expensive headsets, with really good noise cancelling microphones, and well muffled earphones (e.g. $300, and more, aviation headsets), and perhaps a few tweaks to the station circuitry. Having said that, they do still work well while we were recording a moderately loud concert in a theatre, everyone could hear properly. Currently, we have a variety of beyerdynamic (DT 109 & DT 290) and Sennheiser (HMD 224 & HMD 414) headsets.


Pinouts
3-pin XLR intercom line
- Cable shield and power ground
- Intercom audio signal
- +12 volts DC power
The XLR connector shells on the cables can be connected to the ground pin inside the connector, our system isn't upset by that. Since most of our XLR cables are used for microphones, we ground the female connectors, that leaves any floating cables with shielded sockets. The male shell is grounded by whatever it's plugged into.
Using a 3-pin cable allows the use of ordinary microphone leads. This intercom is different from various other intercom systems, I haven't tried to make it compatible, I don't have the information I need to do that well, it's not really needed for our own work, and often not practical (there's too many different systems). If we have to tie two, or more, intercom systems together, there's better ways to approach it than simply joining the party line buses together.
8-pin intercom line
Most stations are mono, with these connections:
- +12 volts DC power
- Power ground
- Intercom audio signal (approx 1 Vp-p with moderately loud audio)
- Intercom audio ground
- Program audio signal (mono)
- Program audio ground
- Tally signal
- Tally common
Stereo stations use this variation:
- +12 volts DC power
- Power ground
- Intercom audio signal
- Intercom audio ground
- Left program audio signal
- Left program audio ground
- Right program audio signal
- Right program audio ground
For either case, audio wiring could be shielded, or twisted pair (tested with up to 100 metres of CAT5 cable as the patch lead, having acceptable cross talk between audio signals and acceptable levels of hum pickup—both significantly quieter than the desired signal, and almost unnoticeable under most working conditions). And the program audio feeds can be used for any audio signal (e.g. monitoring another talkback system, one-way).
5-pin XLR headset
- Microphone shield
- Microphone audio signal
- Earphones common ground
- Earphones left signal
- Earphones right signal
An alternative, no-longer used by us, but recorded here for those who might try connecting a different (and incompatible) headset:
- Microphone shield
- Microphone + audio signal
- Microphone - audio signal (connected to pin 1 if unbalanced)
- Earphones + signal
- Earphones - signal
The XLR connector shells on the headphone cables are not connected to any pins inside the connector. The shell is grounded by the chassis of whatever you plug it into.
We originally used the second arrangement, for various reasons: Most of our headphones came wired that way, none were wired the other way. The stations were built for video production work, not theatre staging, and using a balanced microphone signal was more desirable than two-channel earphone audio. Mono earphones allow headsets to cover one or both ears without missing out on hearing the audio from an earphone that's not placed over an ear, it provides redundancy for an earphone that goes open-circuit, and it's easier to understand speech when you can hear it in both ears. The use of one headset connector is more convenient than dual connections (e.g. one three-pin XLR for the mike, and one 6.5 mm connector for stereo earphones). And it would have been far more expensive to use seven-pin connectors on all headsets, which would have allowed balanced microphone audio and independent stereo earphones, with complete electrical isolation between each transducer.
We switched to the first method after getting some DT-109 beyerdynamic headsets with unbalanced microphones, and good-enough earphones to use for audio monitoring as well as intercom. Now all the headphones are wired for stereo earphones and unbalanced microphones, so any headset can be used on any station, and other equipment; and this wiring layout is commonly used by other some system's headsets. Most remote stations are still only mono audio, with the same sound in both ears (left and right being joined together in the equipment socket, now, rather than the headphone plug). Stereo stations can monitor program sound in stereo, but intercom is still monophonic to both ears at once. Balanced audio, when needed, is provided by the circuitry in the station, rather than the headset.
I mention this saga for anyone else contemplating designing an intercom, and wondering which might be the best way to go. The benefit of balanced microphone connections was marginal when there's only a couple of metres of flex between the headset and the intercom station (there are more noise problems from a headset microphone being near equipment, than its cabling). But the convenience of being able to use any headset, anywhere, without needing adaptors or different cables is significant.
7-pin XLR headset
- Microphone shield
- Microphone + audio signal
- Microphone - audio signal (connected to pin 1 if unbalanced)
- Left earphone - signal
- Left earphone + signal
- Right earphone + signal
- Right earphone - signal (connected to pin 4 inside stations not requiring completely separate left/right speaker wiring)
The XLR connector shells on the headphone cables are not connected to any pins inside the connector. The shell is grounded by the chassis of whatever you plug it into.
Currently, we have one stereo headset on a 7-pin plug. This one's intended for an audio operator to use as a combined talkback and audio monitoring set, so they only need to have one set of headphones for both tasks. Most of the crew do not need stereo monitoring, so the extra expense of more seven-pin connectors (about four times the cost, or more), and additional audio amplifiers per station, is avoided.
The intercom system tests well with 200Ω dynamic microphones, cheap electret microphones of unspecified impedance, and 8Ω–400Ω earphones (various beyerdynamic, Sennheiser, and other headsets). Higher impedance headphones (e.g. 1kΩ) were a bit too quiet for some environments.