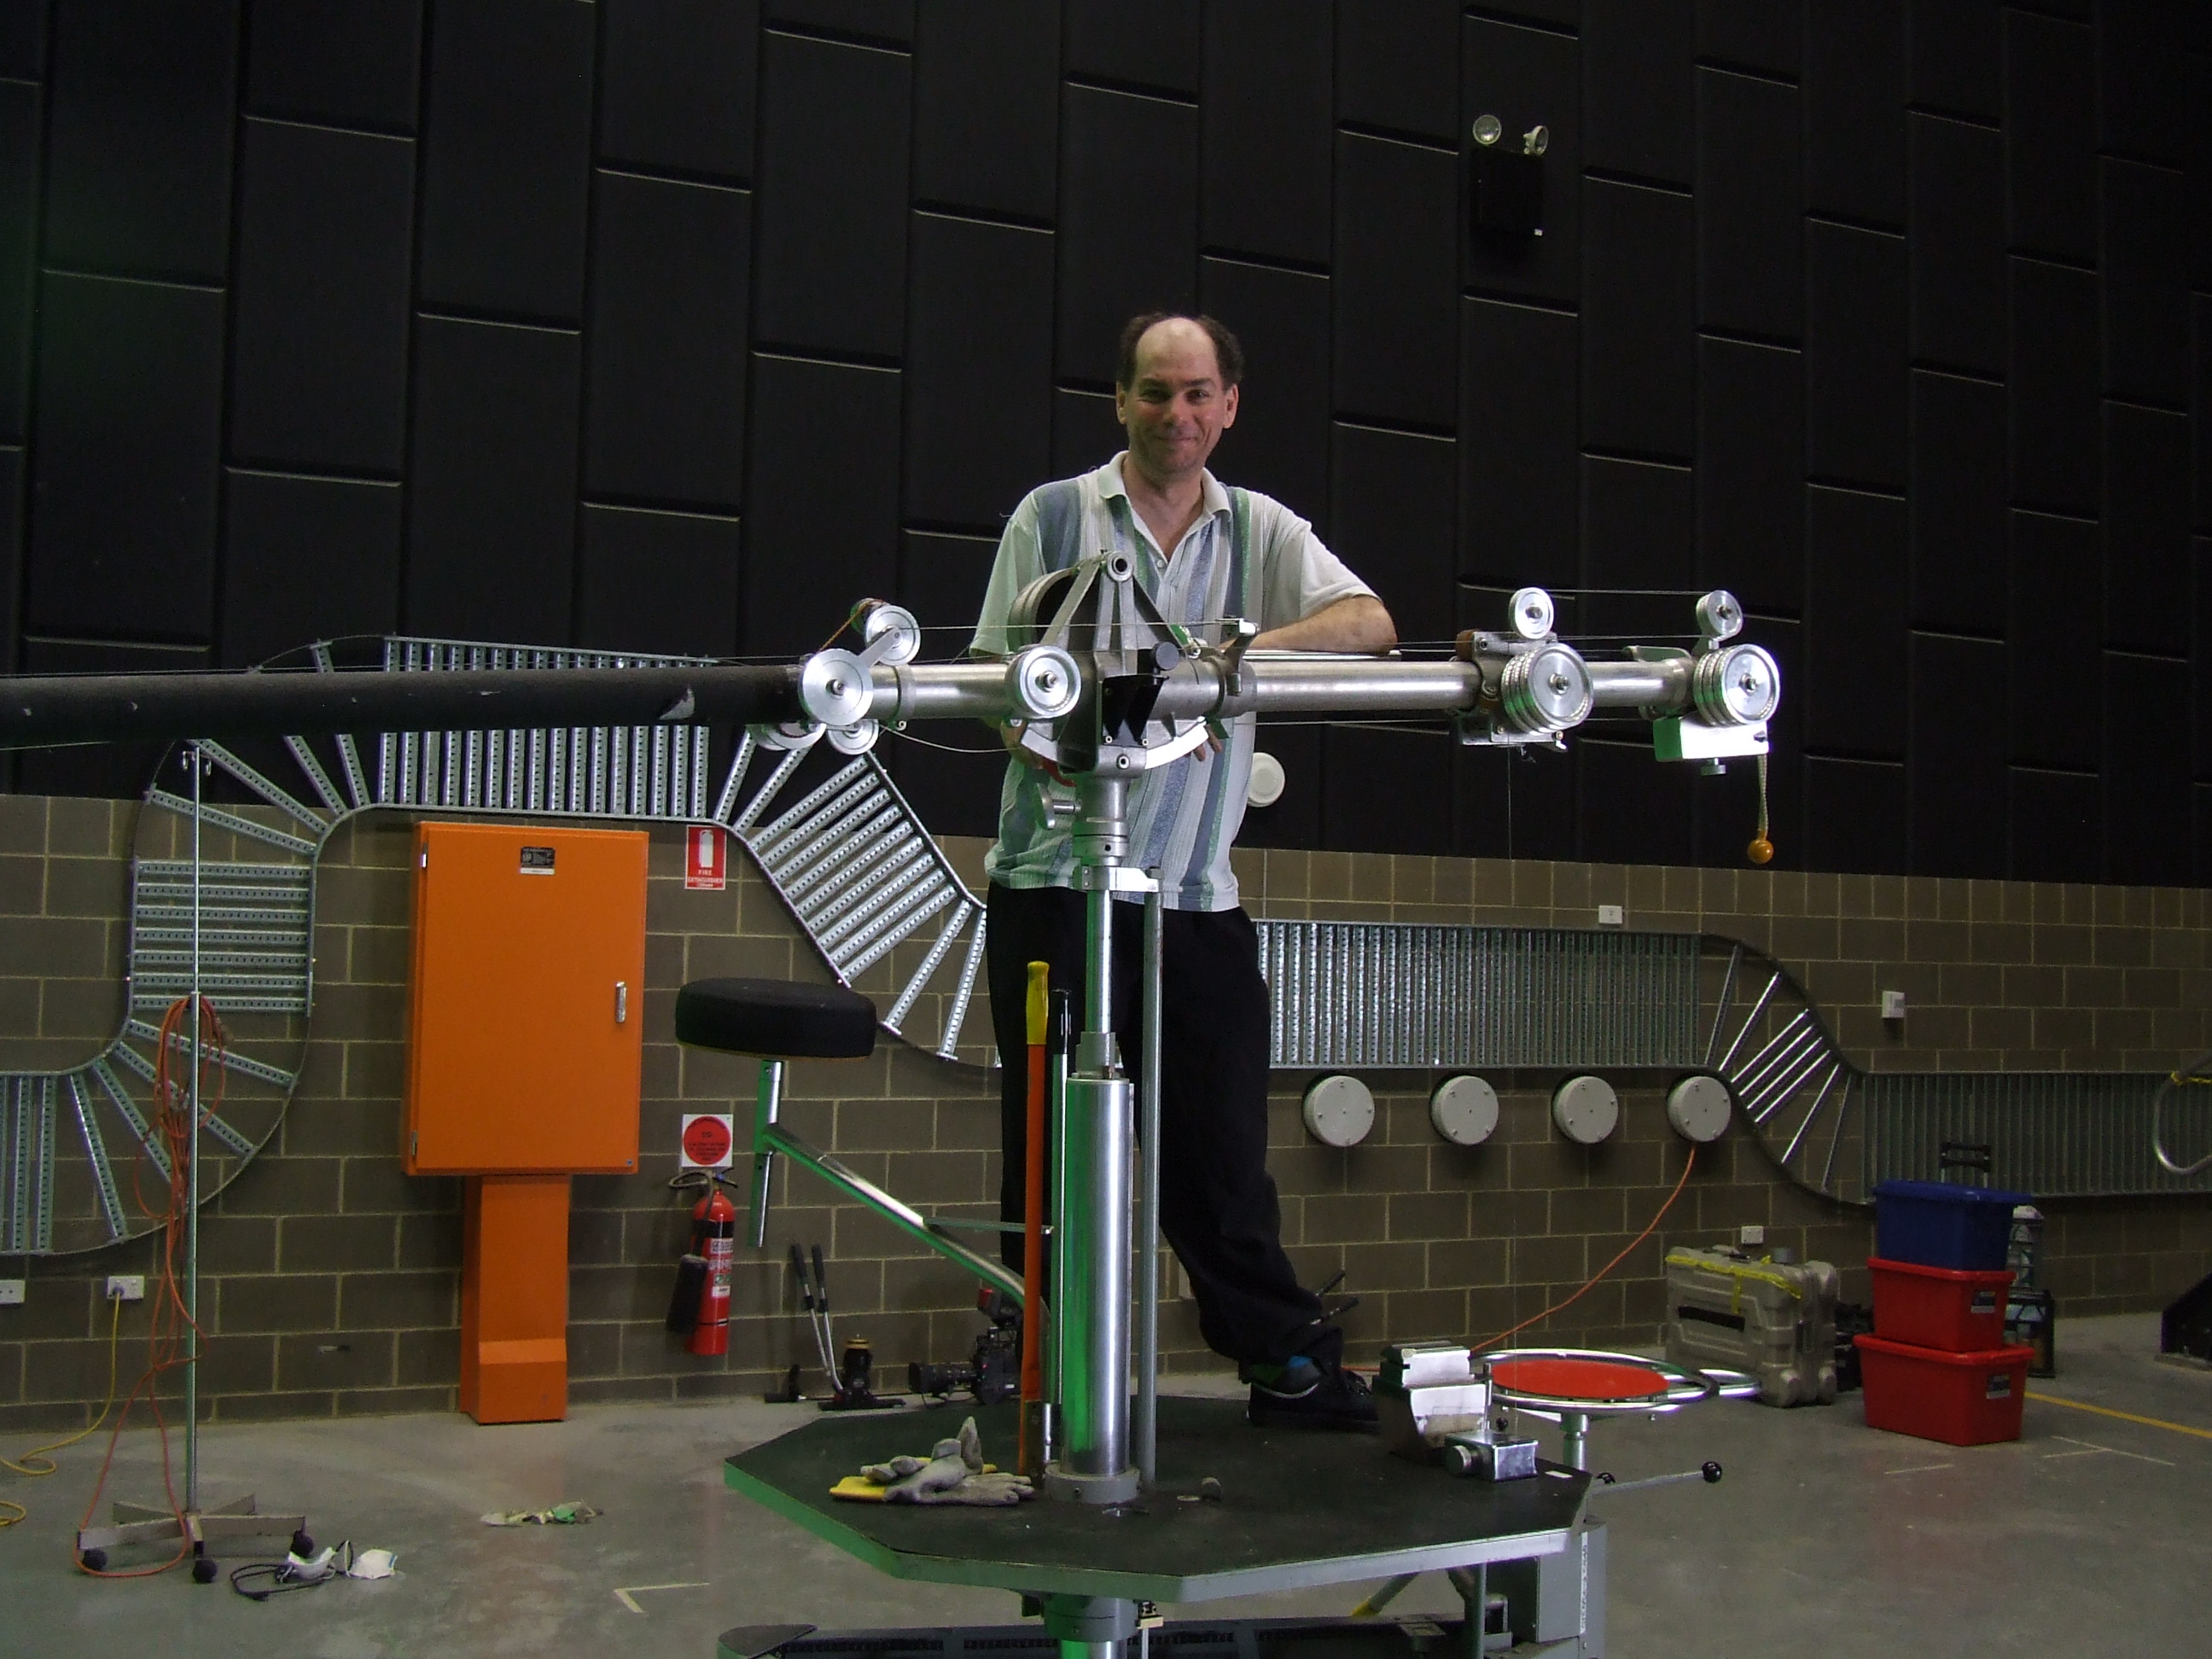
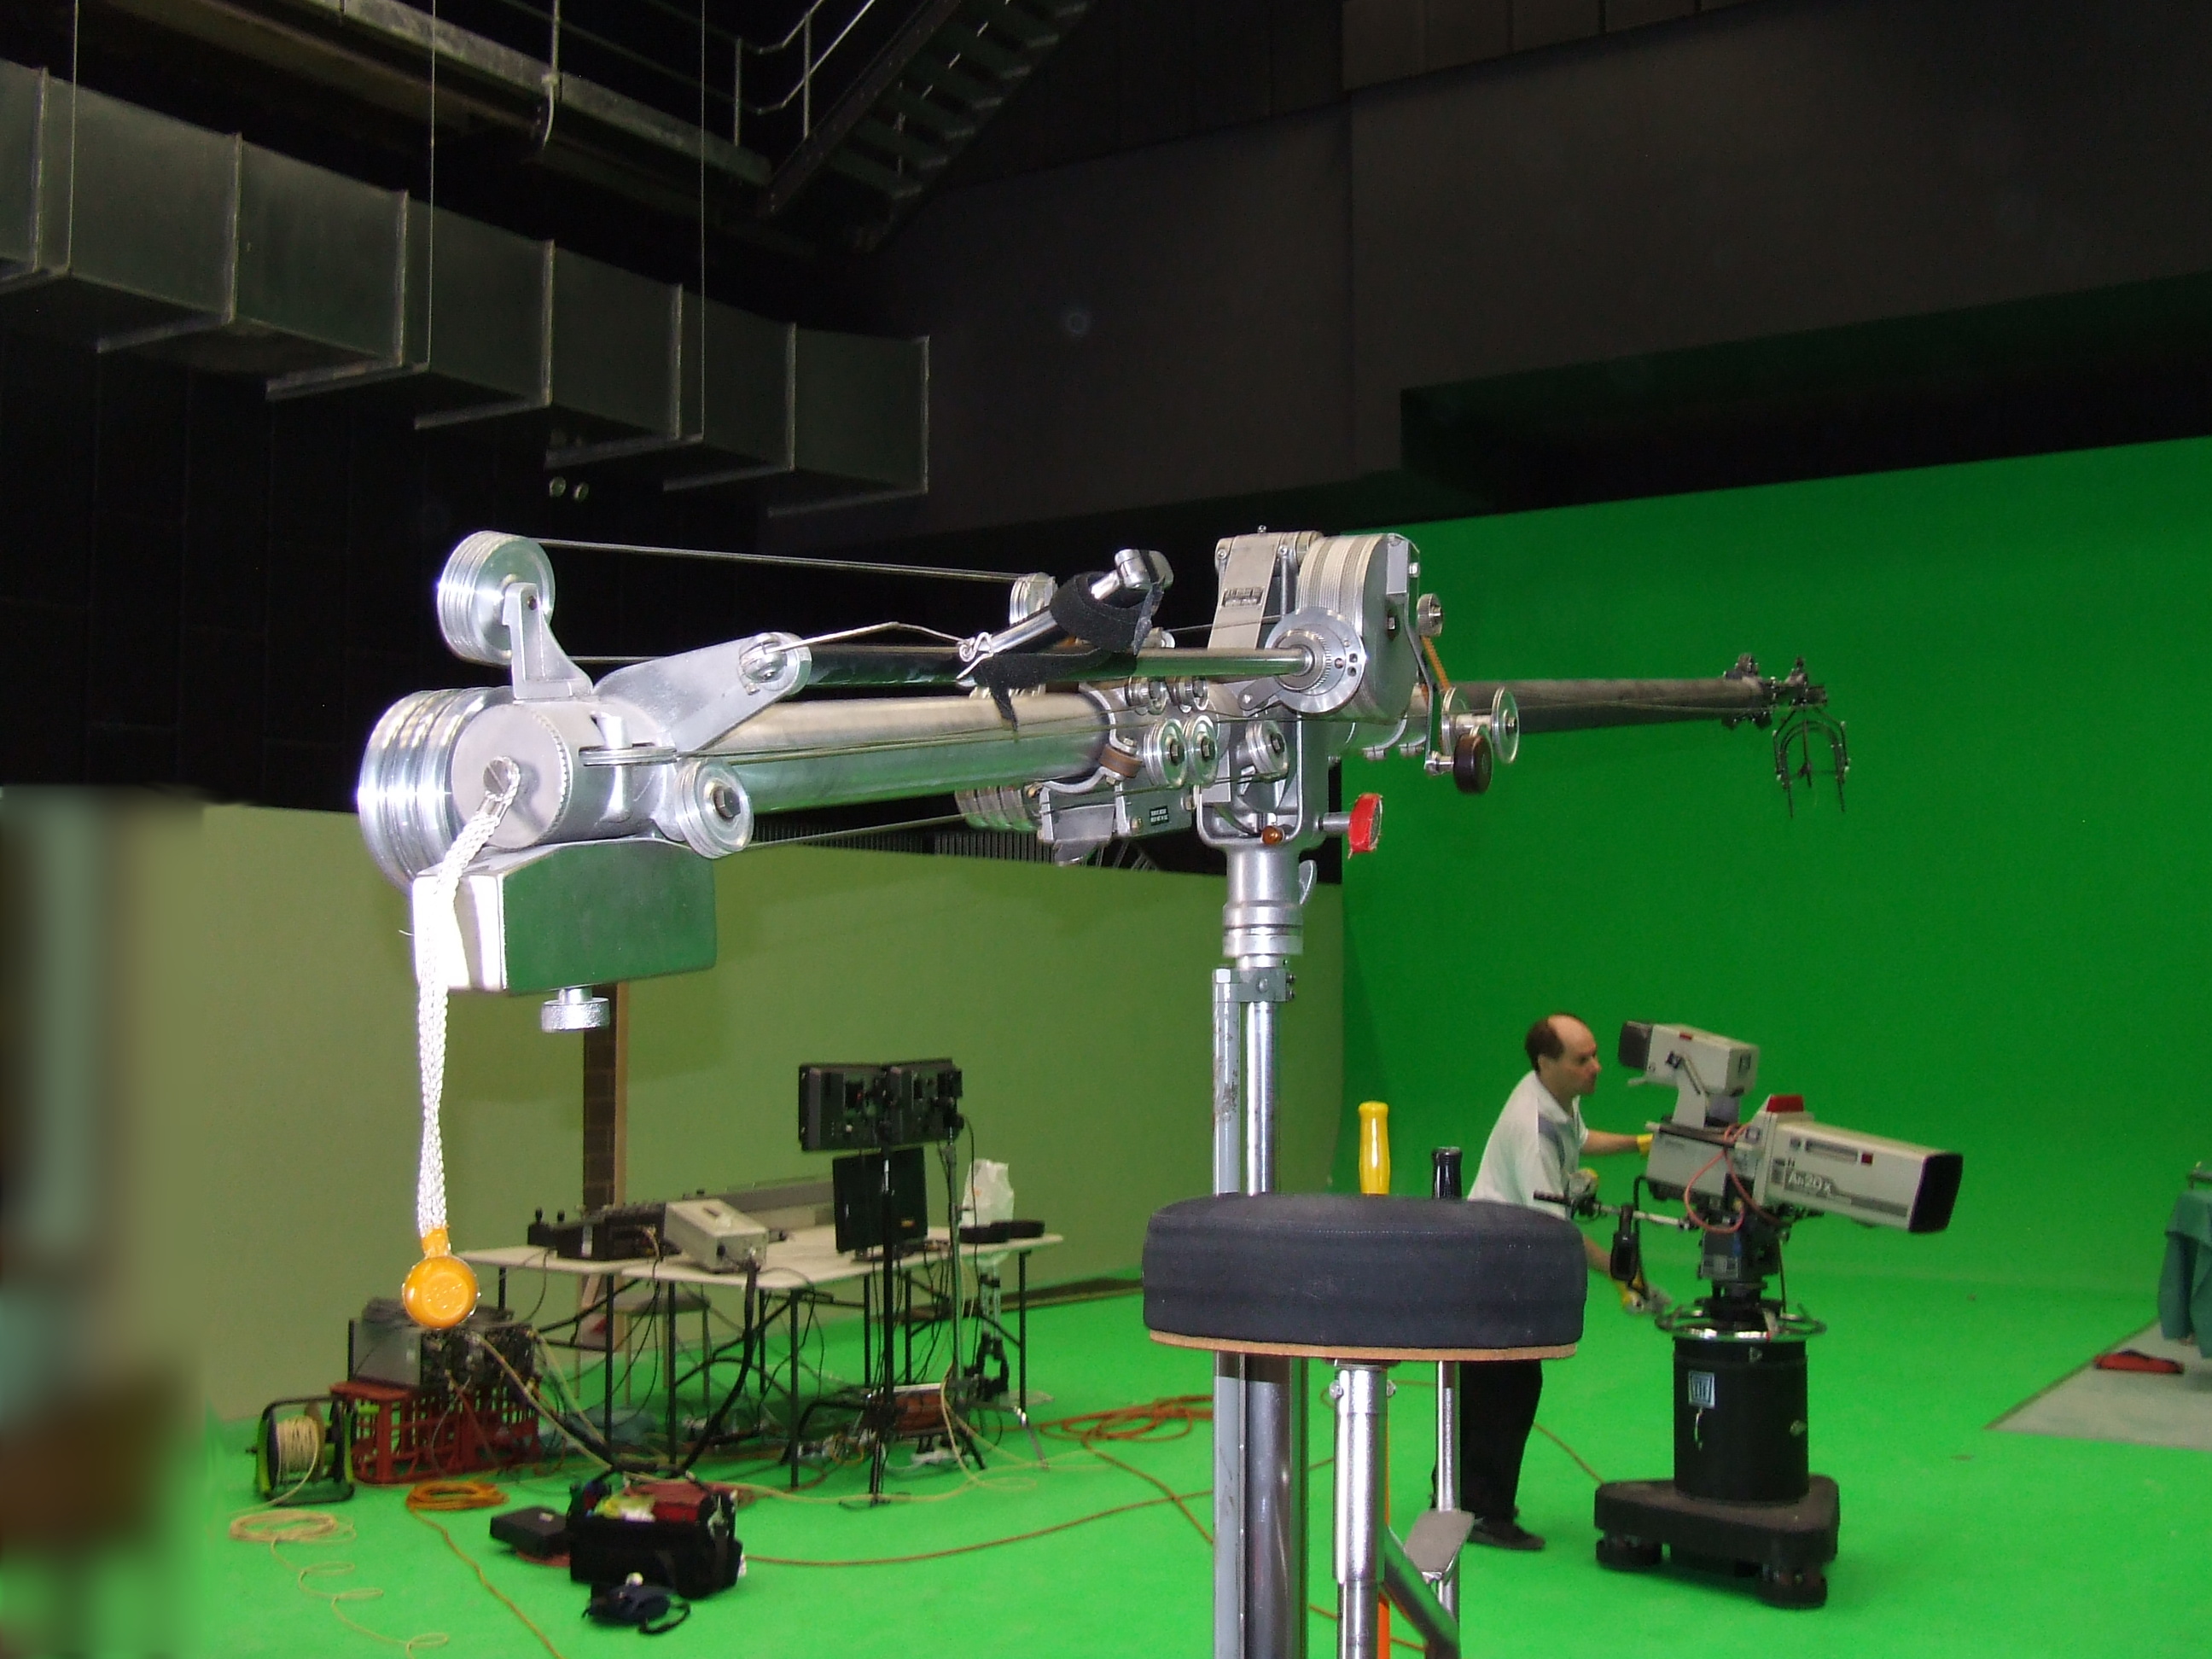
Twice, now, I've come across this Fisher boom, and both times it's been in a state of disrepair, this time it was my turn to bring it back to life, and I'm sure I'm destined to encounter it again. The boom used to belong to the ABC in Adelaide, but they gave it to Flinders University, many years ago, now it's been hired for a production. Today, it's in the South Australian Film Corporation's Adelaide Studios at Glenside, in the smaller television studio (where this photo was taken of me standing on it). Peculiarly, neither Film Corp studio has a lighting grid (just a catwalk above several massive iron girders), nor a prop bay or workshop. Consequently, rigging and equipment has to be hired in, at no small expense. And crews end up building and painting sets in the carpark (getting dust and crap blown onto their wet paint), or in the studio (spreading dust and fumes). That's the kind of silliness you expect at a film school, not the state's film studios.
Not having any documentation about how to re-string it, it was a fair bit of trial and error to work out how the string should go around the mechanism, but I think I managed it. So, if anybody knows, for sure, how it ought to be done, I'd appreciate the information. Later on, I found some brochures for more recent Fisher boom models, which are almost the same, but no manuals, and there wasn't enough pictures to work it out, fully. Though it was enough to show that the counterweights were initially mounted in the wrong places (as seen in these pictures), the large solid one should be mounted above the rolling section (where you can easily crush your knuckles between it and the squeezable grip for rotating and tilting the microphone cradle), the smaller solid one under the back of the rear of the pole. The third, hollow, counterweight that lets you insert variable amounts of lead weight inside it, to tune the weight to suit your microphone and cabling, mounts under the rolling section. We couldn't work out how it was supposed to slot in (it looks like it has a catch and a quick release), we had to remove the rear bolt to insert the counterweight, and replace the bolt to hold it in place. You can see these weights by my left foot, sitting on the platform, in the photo at the top of this page.
It is a really vintage model. The J.L. Fisher website has newer models listed on it, that are similar, but not close enough to be a good-enough guide to working it out, and even they don't have a close-up view of how the boom is strung up. The first time I saw this boom, it was in the corridor between studios at the ABC, in the mid-1980s. And I'm sure that they had it a lot longer before I saw it, the design looks 1960s/1970s.
NB: All of the small pictures on this page can be clicked on to see the full-sized versions. The full-sized versions don't have the highlighting colours drawn over them. I've used the same colours for the same strings, in all the pictures, so it's easier to follow where they go. And, I must emphasise, that I know some of the photos show the boom not set-up correctly. I, eventually, got it into a workable condition, but not optimal. But didn't have an opportunity to re-photograph it.
 Corrections to this photo: The mike cradle rotator string is erroneously passing through the mike cable clamp (the thing with the wingnut). And that clamp has been mounted upside down. It should hold the mike cable above the control string. There's a number of mike cable clamps missing, as well (they look like miniature broomstick clips). |
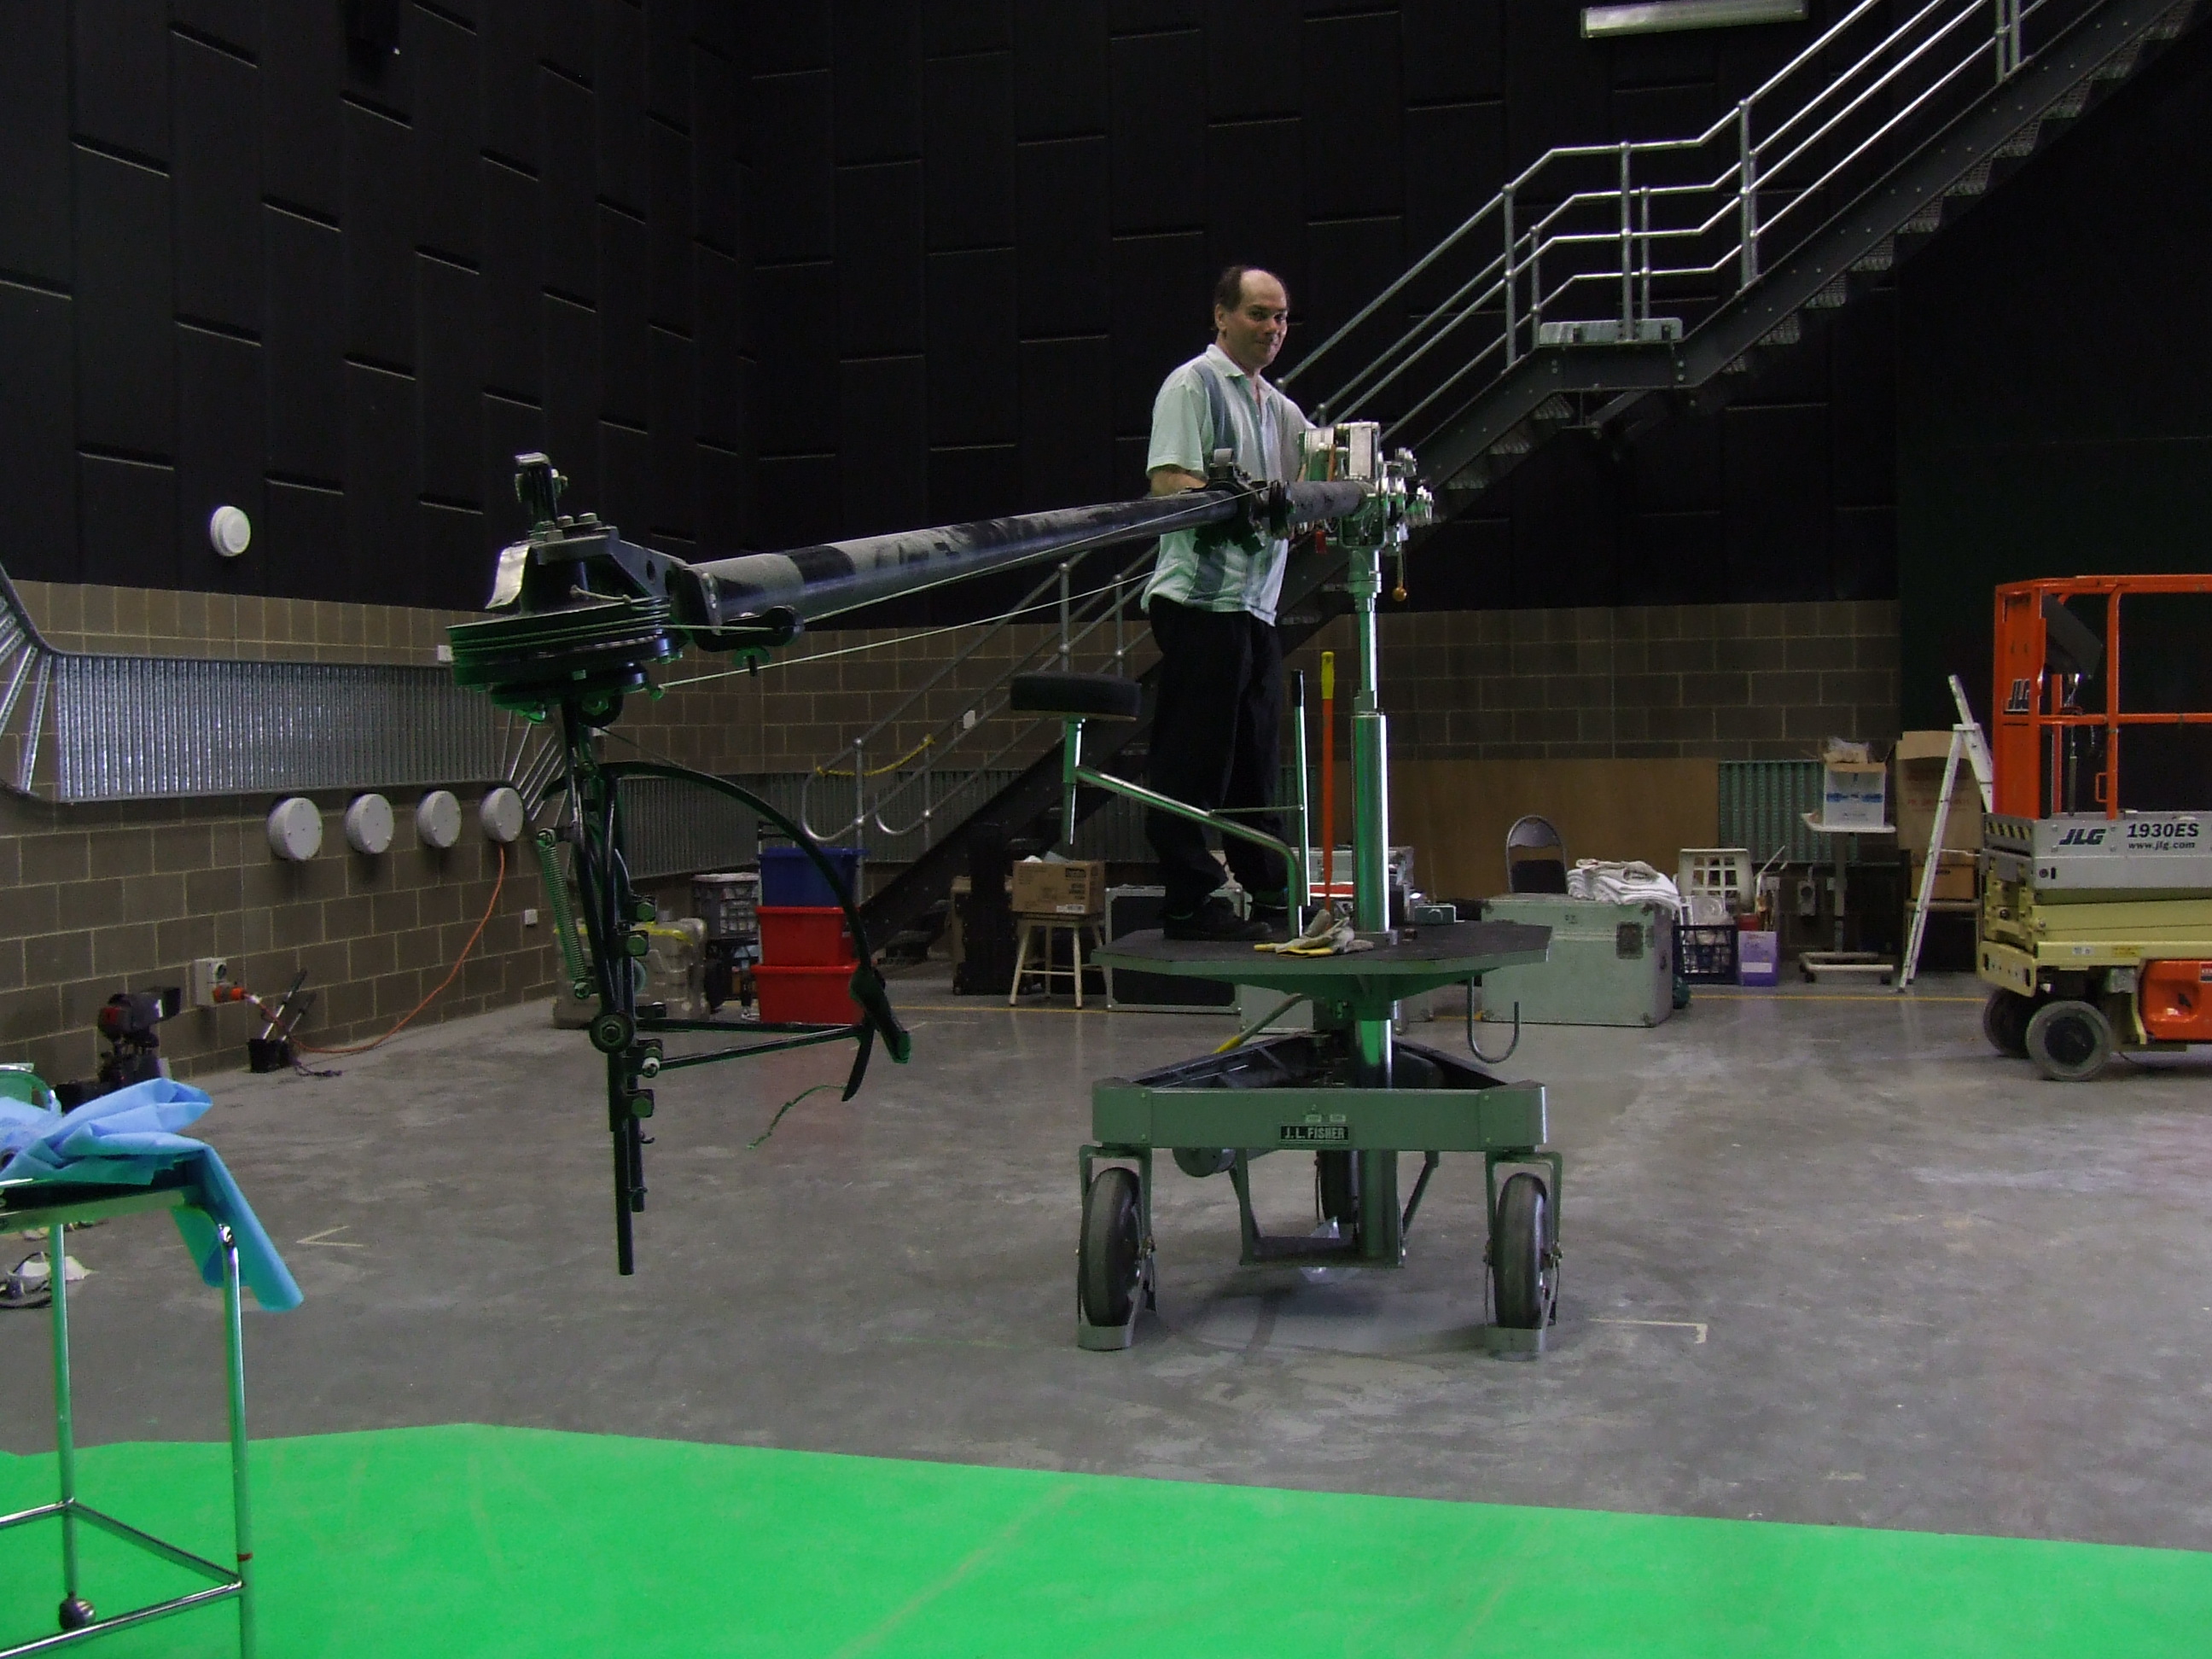
Several strings drive the moving parts of the boom arm and mike cradle, to extend and withdraw the telescoping section of the boom arm, and adjust the angle of the mike cradle. The drive strings really are just string, not wire. The mike cradle strings aren't directly driven by the operator controls; instead, the controls move a second set pulleys that are pushed against the drive strings, re-tensionining them, and this moves the mike cradle. But the strings that move the telescopic boom pole in and out are directly driven, a crank handle pulls the strings connected to the pole. Moving the boom up and down, or left and right, is simply done by shoving the pole with your arms. It's not perfectly balanced, and has a tendency to lift up or fall down, depending on how far the telescopic section is extended. There are moving counterweights that are supposed to compensate, but they don't quite do the trick, and considerable effort is required to adjust the boom-arm tilt-angle at the two extremes of pole length. I'm not sure if this is a design flaw, or the boom needs further work to configure it properly. The platform that you stand on, or sit on the attached seat, can be raised or lowered (there's some kind of hydraulic system, with a manual hand pump arm, that doesn't appear to be functional on this unit). And I beleive the pole that the swinging boom mounts on top of, will rise or lower, at the same time. The wheels are chained together, so they can all be steered together. Or the front two (as seen in this photo), can be locked into the forward-facing position, and the rear wheel steered independently. There's a brake on the rear wheel, to stop the platform rolling away. And cable guards around each wheel, to push cables out of the way while tracking around the studio, which can be lifted up for when you need to transport the boom, elsewhere. The tyres are soft/squashy pneumatic types, and the whole thing rocks about while you're on it. It has a resonance that's like when you're in a small dinghy on a lake. |
 Corrections to this photo: The orange string is erroneously passing through the mike cable clamp (the thing with the wingnut). And that clamp has been mounted upside down. It should hold the mike cable above the control string. There's a number of mike cable clamps missing, as well (they look like miniature broomstick clips). |
Just two strings control the angle the mike is aimed at (tilt and rotation). The rotating mike cradle is spring loaded, you wind the cradle around a few times (clockwise, from the point of view underneath the cradle) to tension the spring, then let the control string wrap around it a few times as the spring rotates the cradle back around. This string (highlighted with orange) passes back along the boom, through a guide. There's a pulley missing just right of the rotating mike cradle, or the control string is simply supposed to pass over the top of the mike audio cable, in free air. The drive string is being pulled through what's supposed to be the clamp for the mike audio cable. On the other side of the boom (hidden on this photo), there is a a pulley for the tilt string, I would expected there to be similar pulleys on both sides of the boom pole. Just underneath the rotating platform are three screws jutting out at 45 degree angles that allow you to reposition the angle the mike cradle faces at. Positioning the cradle to face the mike forward when nobody's holding the panning grip seems to be the right position), but it's facing backwards in this photo. When the panning mechanism is operated, it gives about one a half turns of the rotator, though the panning handle is only easy to operate for about 270° of that. There should be a mike audio cable clip somewhere on this platform, and there's another on the mike cradle arms, to hold the cable out of the way of moving parts, and providing enough slack for the cradle to move, and isolate the the microphone cable from physically transmitting boom handling noises to the microphone. The mike cradle tilt control string (highlighted with blue) passes through the top of the rotator, around a couple of pulleys, and back along the outside of the boom, on the side that you can't see in the photo, although you can see the string held out quite some way from the pole. This picture shows the tilt cradle facing backwards (the moving part of it highlighted with yellow), if you pull the tilt string, the cradle will end up tilting back along the boom pole (as per the yellow arrows). |
 |
This is half way along the mike boom, it's where the telescoping section enters the fixed section. On the left side, behind the pole, is the mike cradle tilt control string (highlighted with blue), it passes by without going through any pulleys. On the right, you can see the mike cradle rotation control string (highlighted with orange), going over the top of a thin black pulley. Next to it is a fatter black pulley, where the mike cable would pass over. The two pulleys spin independently from each other. |
 Corrections to this photo: The large counterweight seen hanging under the boom, should be mounted on top of the sliding mechanism. |
Top right is a squeezable grip (with a yellow highlight drawn alongside it) used to adjust the tilt angle of the mike cradle, by squeezing the grip, which pulls on the red-highlighted control string (that's pinged-off and gone slack in this photo). You can see some velcro around the grip, as someone's solution to fix the mike at a specific angle (there isn't a built-in lock control). The grip is, also, used to rotate the shaft that it's mounted on (as per the yellow arrows), to change the rotational angle of the mike cradle. Which pulls on another string (highlighted with aqua), to move a small pulley that re-tensions on of the mike cradle strings. Just below it is a string coming out the back of the pole (highlighted with purple) and going around a horizontally mounted pulley (it's anchored inside to the end of the telescoping section of the mike boom arm), it goes back and forth a couple of times around four pulleys (two on the moving section, two at the back near the horizontal pulley), then anchored at a knurled knob on the moving section above two of its pulleys. The knurled knob lets you take up the slack on the control string when initially setting up the boom The large counterweight seen at the left of the picture, mounted under the end of the boom, is in the wrong position. The smaller fixed counterweight should be attached here, and this large one should be mounted on top of the sliding section. |
 |
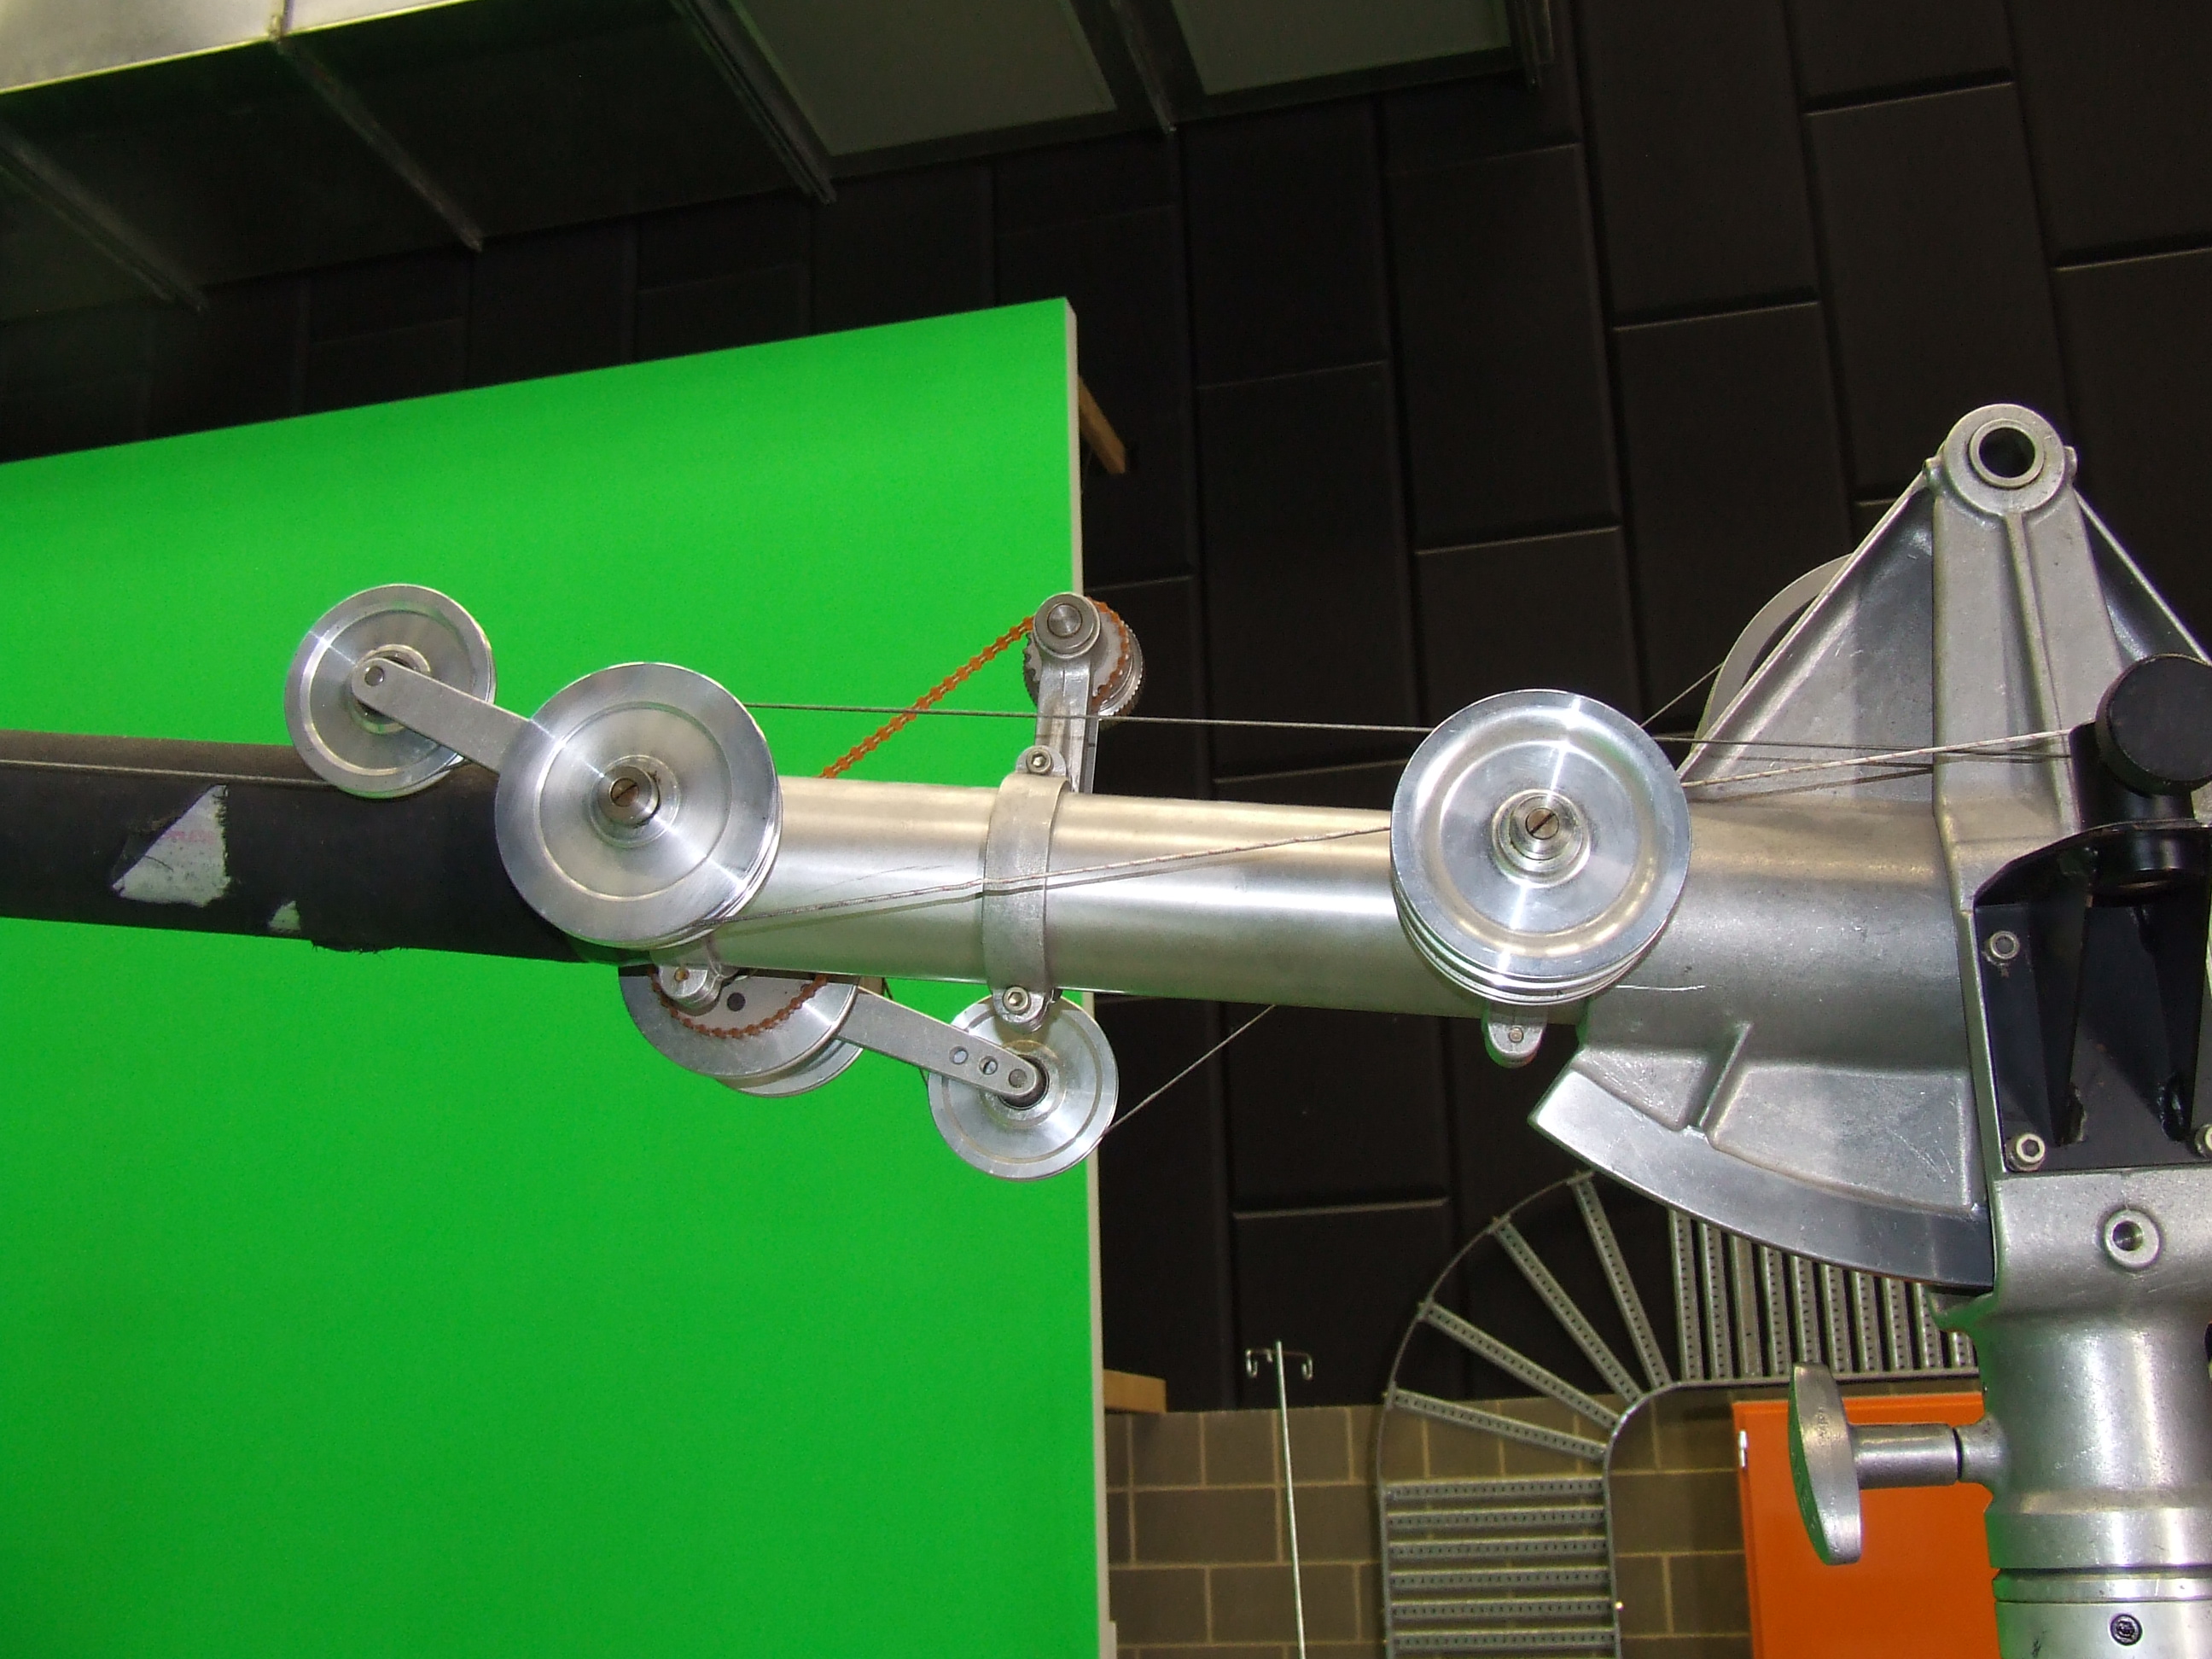
The squarish section with pulleys moves along the back of the pole as the front telescoping section is extended or withdrawn. It should have the large fixed counterweight mounted on top of it, and the variable counterweight mounted under it. As it moves, it maintains appropriate tension on the drive cords by taking up the slack as the pole is withdrawn, and the counterweights get repositioned to counteract the shift in centre-of-balance. Just above the pulleys are two knurled knobs which can be turned to initially tension the strings up. The string on the left set (highlighted wih purple) eventually goes into the back of boom arm, and to the back of the telescoping section. The string on the right (highlighted with green) goes around the big drum, and eventually goes into the middle of the boom arm, where the telescoping section slides into the fixed section. Together they telescope the boom arm, and move the counterweight. Above it is a rotating pole that is twisted (using a squeezable grip), to rotate the microphone cradle around. Squeezing the grip changes the angle the microphone is tilted at. At the right-hand side of the pole is a knurled knob, then a pulley. The control string (highlighted with aqua) went over the top of the pulley, going downwards around the outside (the side facing the camera). This kept popping off until I adjusted the length of the string. It may be that it's supposed to go under the pulley, instead. The knurled knob seemed to serve no practical function. To the right of it is the large drum with a crank handle, it's used to wind the extendable portion of the pole in and out. It has two strings wound around it (several times, for grip). The inner one (green highlight), is directly attached to the telescoping section of the pole (for extending or withdrawing it). The outer one (blue highlight) is the other end of the mike cradle tilt string, it shortens the tilt string as the telescoping boom arm is shortened. I don't know why they didn't employ the same technique for the mike cradle rotator string, instead of having it go around several pulleys attached to the moving counterweight section. |
 |
A string (highlighted in blue) can be seen coming down from top left (from the large drum), going under the smaller pulley on the left, going over larger the pulley to its right, then going down alongside the boom pole out of view to the right (it goes to the mike cradle tilt mechanism). The left pulley is moveable, rotating around the axis of the right pulley, in an anti-clockwise direction, on command (highlighted with yellow). As it does so, it tightens the string, and causes the mike cradle to tilt. A white string with a red spiral stripe goes along horizontally near the top of the boom pole (highlighted in red, in this photo), and is fixed to a pulley behind the tilt string's pulley (nearer to the pole arm). When this white string is tensioned (by squeezing the squeezable grip), it swings the moving pulley clockwise. The knurled grip has an orange chain going between it and the pulley that the spiral-striped string goes around. It doesn't seem to serve a practical purpose. Just below the spiral-striped string is another string going horizontally along the pole (highlighted in green). It's wrapped around the large drum with the crank handle (left of this photo, out of view), passes through the gap between the pulleys discussed above, and goes to a pulley in the centre of the telescoping section, then inside the boom arm. It's one of the drive strings for making the telescoping section extend and withdraw. |
 Corrections to this photo: The large counterweight seen hanging under the boom, should be mounted on top of the sliding mechanism. |
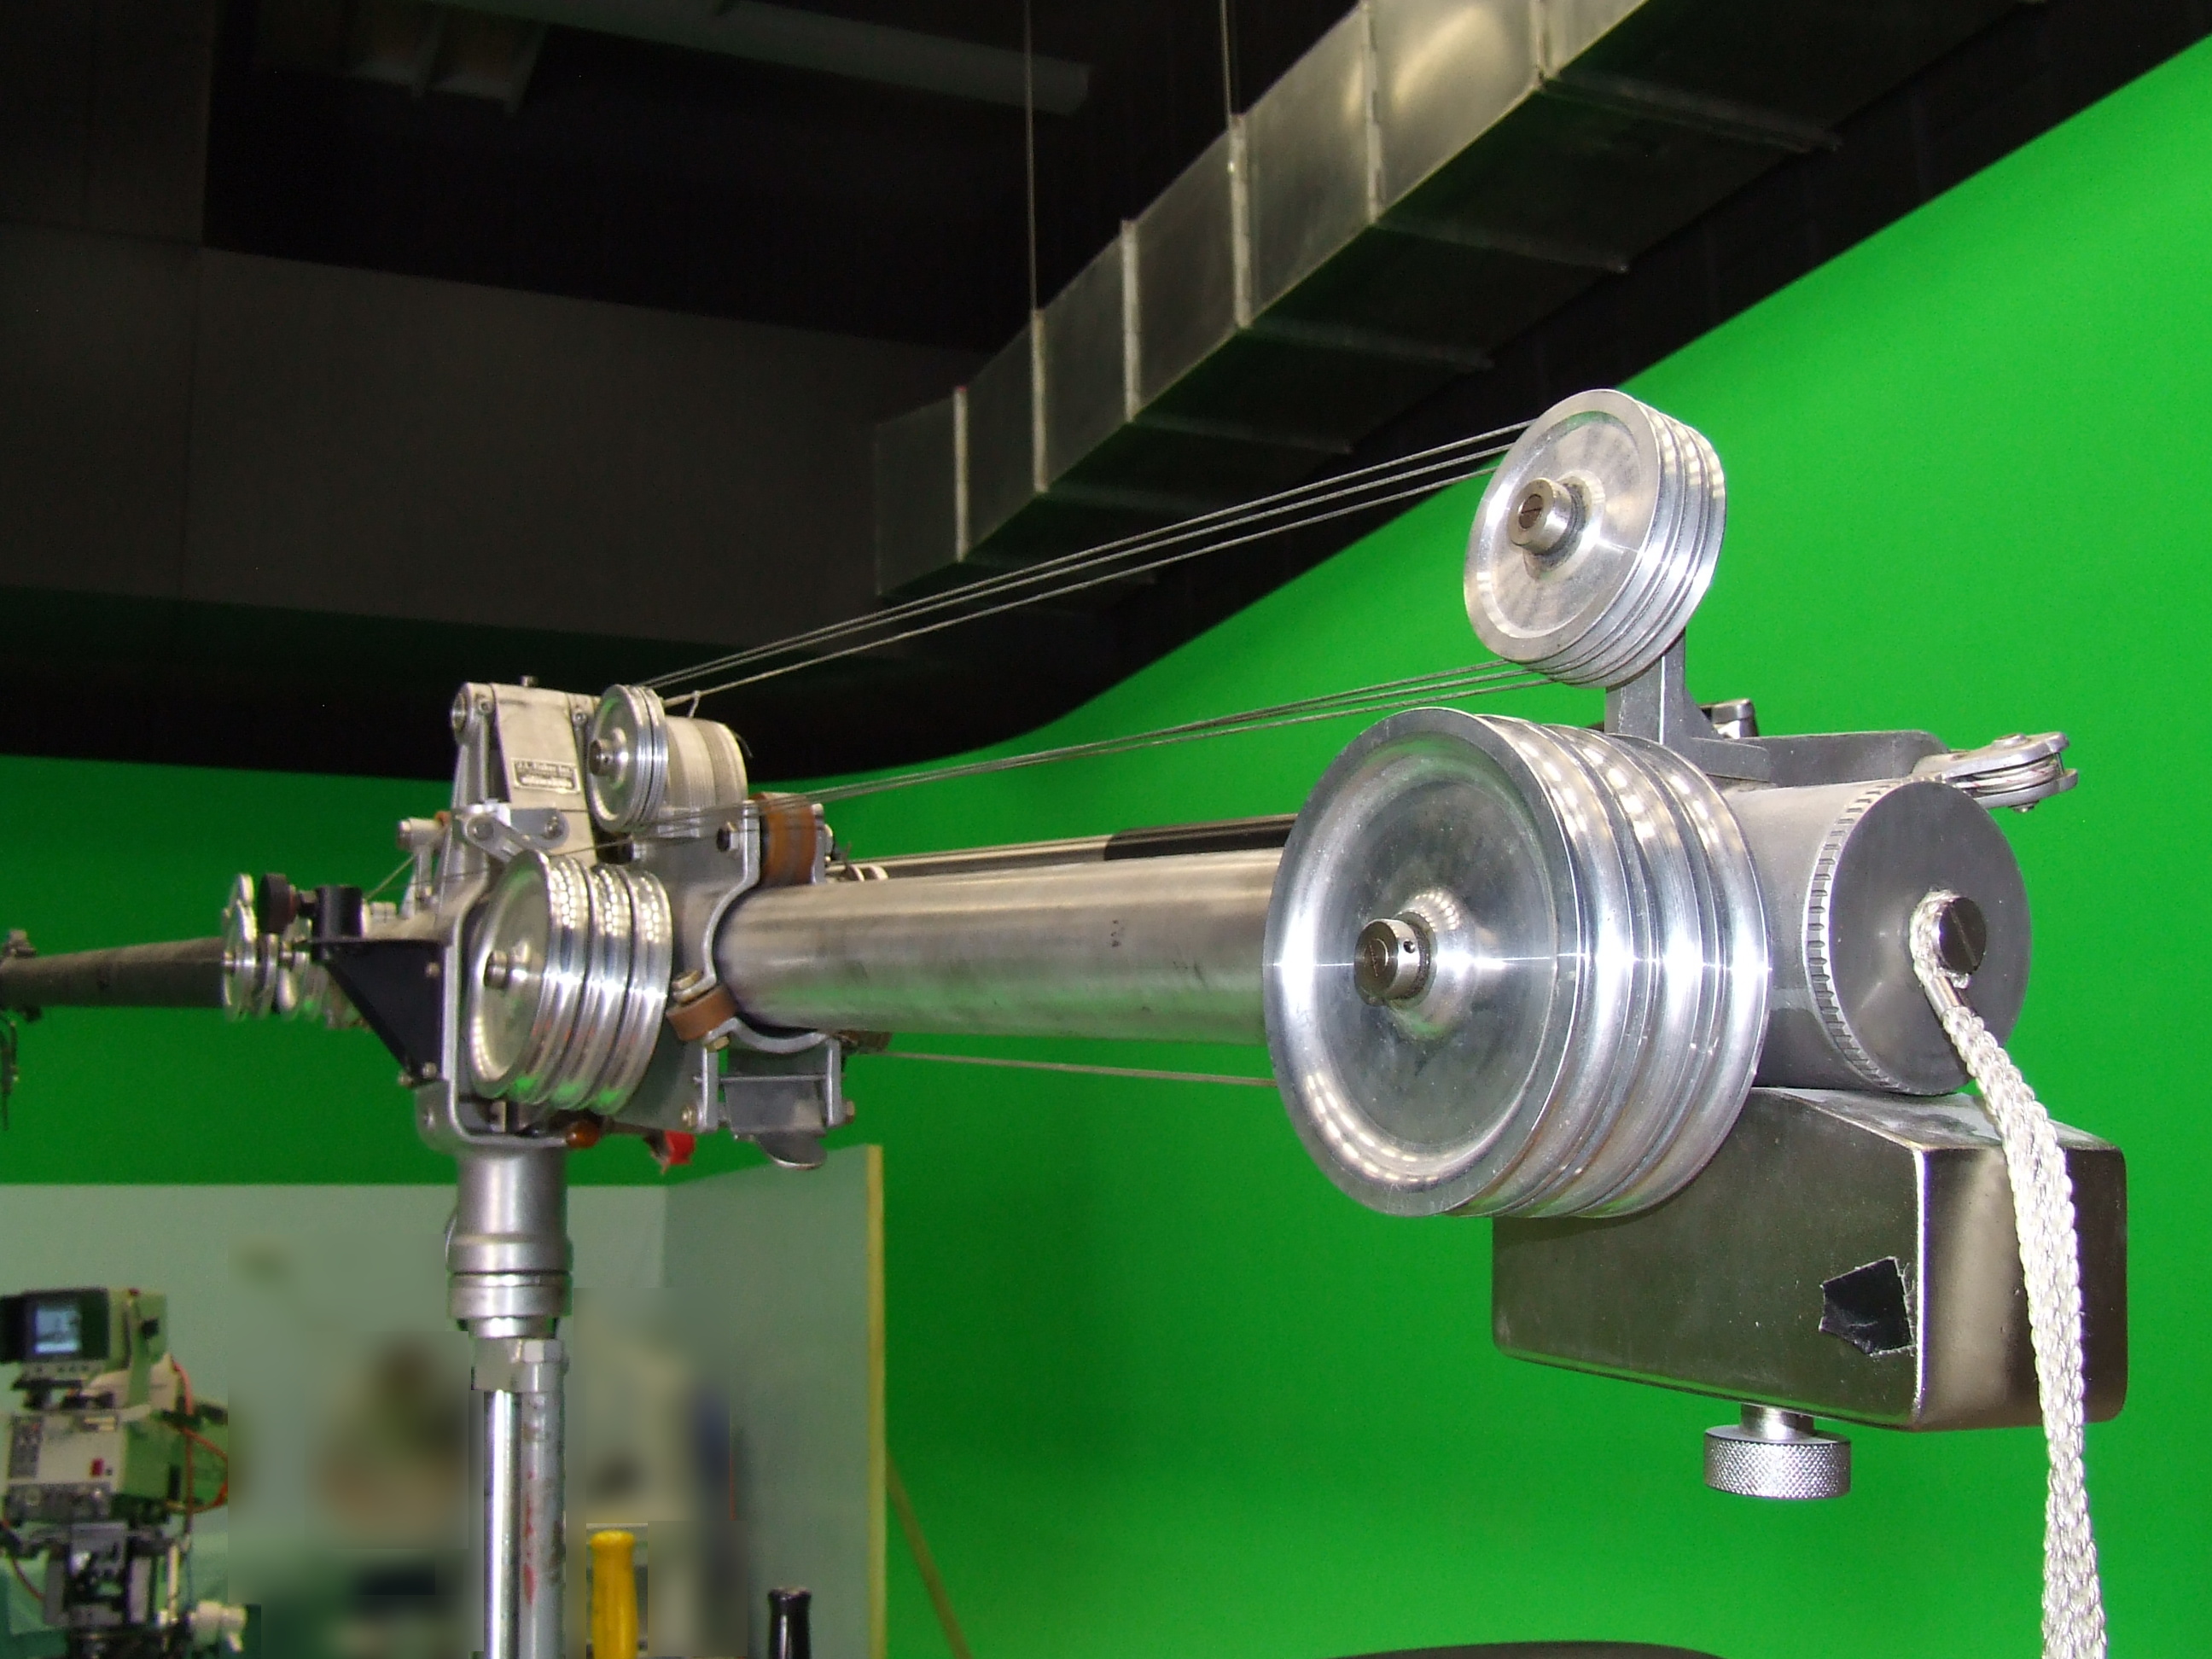
The large pulleys are for carrying the microphone audio cable (none mounted, at the time). It comes from the microphone cradle (clamped in two or three places at the cradle end), passes over a pulley in the centre of the boom shaft (where the telescoping section goes into the fixed section), the around the six pulleys at the rear (the forward set move with the counterweights, keeping tension on the mike cable as the telescopic boom changes length), then it drops down through a hole in the platform. Above them are five smaller pulleys, the string (highlighted with orange) is hooked onto the tag behind the two pulleys on the moving section, looped three times around these pulleys, passes along the boom, over some other pulleys, and is eventually wrapped around the rotating microphone cradle at the other end of the boom arm. As the telescoping boom arm extends and withdraws, the moving counterweight section shifts along the back of the boom arm, taking its pulleys with it, and taking up the changing length of mike cradle rotator string. If this string is not correctly laced up, the mike cradle spins around as the boom arm is telescoped. The large weight seen here, under the end of the boom arm, should have been mounted above the moving section, and the smaller weight should be mounted here. |
 |
The red spiral striped string (highlighted with aqua) coming in from mid-right and sloping down towards the left, comes from the squeezable grip (out of view), passes through the gap between the large pulleys on the right (there are two independent pulleys on the same axis), and attaches to the front section of the large pulley on the left (there are two, on the same axis). When the grip is used to rotate the shaft it's attached to, it tightens this string, and causes the smaller pulley (left-most in this picture), to rotate anti-clockwise around the axis of the pulleys just right of it (in the direction of the yellow arrow). Just behind that spiral-striped string is another string (highlighted with orange) that's sloping upwards towards the left, it goes over the top of the thin large pulley on the right, then over the top of the large pulley on the left, and under the smaller pulley that's even further to the left. When the smaller pulley rotates around the larger pulley, it tensions up this string, and rotates the mike cradle. In front of the thin large pulley on the right, mounted on the same axis, is a fatter pulley for the mike cable to pass over. These two pulleys spin independently of each other. |
 Corrections to this photo: The large counterweight seen hanging under the boom, should be mounted on top of the sliding mechanism. |
The large counterweight seen at the left of the picture, mounted under the end of the boom, is in the wrong position. The smaller fixed counterweight should be attached here, and this large one should be mounted on top of the sliding section. It's a significant danger point for smacking your head against, either walking into it, or having it swung into someone, and it could really do with some padding being fitted over it. |
Just some brief notes about using the boom, the mechanics of it, more than the sound recording aspects of operating a boom:
The boom operator stands on the platform, or sits on the attached stool, being mindful that the platform is narrow, so you don't step off the edge of it. It's only possible to swing the boom through a bit more than 45°, horizontally, before you get into awkward positions, or mechanical limitations of where the seat is, or run out of platform to stand on, and you can pan more to the right than to the left. So you need to plan where you park the entire vehicle, and how you move it around. You can have a grip push you around while you're booming the mike, but it's not particularly stable.
The boom arm can angle up and down by a similar amount, a bit less than 45° in total, I'd estimate. There's a stopper limiting upward boom (though you still need to be mindful about not crashing into overhead lighting), but doesn't appear to be one in the downward direction, you may end up with metal hitting metal, or worse, the mike hitting the floor.
There are two independent locks for the boom arm pan and tilt. You can see the tilt lock, in the above photos, with red gaffer tape around it. The pan lock is just a bit below, and 45° around the base of the boom arm's pivot point, facing forward. There's little need for the pan lock, other than for transportation, but you'll need the tilt lock to lock the boom into place for extended static shots, if you can't hold the weight of the boom. Despite being able to vary the amount of lead in the bottom moving counterweight, I couldn't get the boom to stay balanced in all configurations of boom length. And that's not something that you can do on the fly.
There are three counterweights on the arm, two are fixed weights that are meant to balance the boom arm against its own weight, there's a third one that you can vary the amount of lead inside it, to compensate for different microphone weights. Some boom arm models can carry up to a 3 pound (1.36 kg) microphone (that's very heavy).
It's really meant to be used as a moving boom, not a static microphone stand. And this particular boom doesn't have enough locks to fix it into a particular position. You'd have to tie various controls against something, to hold them in place. Particularly the mike cradle pan and tilt controls, and maybe the boom crank handle, if it won't stay where you put it when you let go.
When the locks are released, you'll have both hands on the controls, left hand on the grip that lets you pan and tilt the mike cradle, by moving the grip up and down (pan) and/or squeezing it (tilt), and the right hand on the crank handle to adjust the length of the telescopic boom. You'll also have to use your left hand to push the entire boom pole around to pan and tilt the pole. There isn't a convenient spot on the boom arm to grab it with your right hand, to pan and tilt the boom arm, other than part of the mike cradle panning bar, and you'd have to let go of the crank handle to do that (losing the ability to control that aspect of the boom, and potentially having it slide out of position under its own weight).
Other than the boom arm pan and tilt locks, there doesn't appear to be any other locks on this particular model, or they're jammed (there are a couple of knurled knobs, on the mike cradle pan and tilt mechanics, that don't appear to do anything practical).
And now a few notes about the recording side of things:
If you're used to using microphones that are in fixed positions, there's a couple of things that you need to take into account:
When you move a microphone about, you're making your own microphone wind noise, as you move the mike through the air, rather than the usual problem of wind blowing across a mike. The wind-noise effect is still the same, though, either way. So you need a mike that's not that susceptible to wind noise, or has a wind guard fitted to it, and you need to be mindful about how fast you move it about.
When you move a mike around, especially on a complex mount, there's the possiblity of the mount making noises that will get into the mike, especially if the boom isn't in good condition. Unlike a hand-held boom, there's a lot of moving parts. So you need to know basic maintenance of keeping it working order (e.g. keeping control strings and mike cables under adequate tension at all times), and being careful and quiet as you operate it.
The usual trend is to use a highly directional mike on the boom, and aim it carefully at who's speaking. But I've certainly seen studios use less directional mikes, where the boom is more about being able to get it close enough to get good sound, particularly if you need to record group dialogue, and don't want to be swinging the mike back and forth between each sentence. And for more complicated studio recordings, there'd be more than one boom, to be able to cover everyone, and the whole set.
You really must wear headphones, so that you can hear what you're doing, and can take directions over talkback (if needed). For scripted recordings, it's very helpful to familiarise yourself with the script, rather than try to learn everything while observing a rehearsal. For non-scripted recordings, you need to watch everyone who might speak, even more closely. Looking for clues about someone about to say something, noticing them breathing in to get a lungful ready for their lines, noticing someone watching the others and waiting for their turn, etc.
You need to be aware of not crashing the boom into things on set, letting it get seen on camera, nor casting shadows. That may mean going up and over floor-lamps, telescoping back from ceiling lamps as you go around them, or having to insist on some lighting position changes, boom position changes, or needing more than one boom.
Because you will probably be behind or beside cameras, and have to reach over them, you want the platform up high enough that you can reach the boom pole down to your actors, with plenty of clearance.
While hand-held booming may be more versatile (being able to freely move about, and having less mechanical contrivances to manage), a mounted boom really lends itself to doing long continous takes. Hand-holding a boom for ten minutes straight, or longer, isn't something that I want to do, especially not all day long.
More recently, I was contacted by an ex-BBC boom operator, discussing this page. He had this information to add:
The knurled knob on the little chain mechanism is the mike cradle tilt lock—when turned it should lock the chain and hence the pulleys on the tilt string.
The mike cradle pan lock is the knurled knob at the end of the pan/tilt lever arm bar.
When setting the mike, you lock the pan/tilt lever in a comfortable position (as if to operate the mike pointing forwards), and then adjust the three screws in the pan head to actually point the mic forwards. Then when you unlock it, it should feel comfortable.
The boom should always be front heavy slightly, as it is difficult to hold it down, but easy to push upon the tilt/pan lever bar (to raise the boom).
When operating you always have three fingers on the bar, and finger and thumb on the tilt/pan lever to keep control of the whole arm assembly.
Mike cables are rigged starting at the rear inner pulley, going over on to the forward inner pulley, and working outwards and the over the pulleys to the head where there should be a clamp—we then used a thin tail to the mic itself to keep handling noise to a minimum.
At the rear the dangling cable went to a U type clamp, which was attached by a keyring device to the casting under the inner pulley block (think there is a hole drilled there), and pulled tight-ish to tension the cable. Again this affects the ease of use.
A word of caution, we removed weight during times of inactivity as they make flats on the inner rollers of the arm assembly!
When I finally got the boom to work (almost) properly, I found a number of things that still needed addressing, but didn't have time to do:
Much of the mike cradle mechanism was tough to move. I think the plastic rollers for the control strings around the mike cradle need some serious degunking, they should spin freely, but don't. Likewise with the surface of those pulleys (where the string goes around), it should be clean, but wasn't. Also, the various pivot points of the mike cradle need degunking. And you probably need to degunk the string that passes around those pulleys, too.
The mike cable clamp is upside down, and should only be used to clamp the mike cable. The mike cradle rotator string should pass underneath it, freestanding. There are several mike cable clips missing around the cradle that need replacing.
Have a look at the J.L. Fisher website, and this particular link for a brochure for a similar model Fisher boom, and make some large blow-ups of the mechanism photos.
The mike lead leading from the mike to the boom ought to be very lightweight and flexible, to avoid transmitting sound from the boom, through the cable, to the mike. However, running a thin cable down the full length of the boom has other drawbacks. A solution could be to run a normal mike lead down the boom, ending with an female XLR held by the mike cable clamp on the boom arm (clamp the connector, rather than the cable). Then run a thin pigtail from there to the mike.
For transportation, there are too many free moving parts on the boom. Since they don't want to lock, and some parts don't seem to have a locking mechanism, I'd suggest strapping the crank handle (that winds the boom and moves the sliding mechanism) into place, for transport. And maybe a shoelace or two around the boom and strings, to stop them getting pulled out of place.
I'd extend the boom, periodically, and clean off the dust, so there's less gunk to get in the mechanisms.